Posts tagged kitchen
Sneak peek at my kitchen + a little interview

THIS IS MY KITCHEN! It's almost finished! Well it is finished aside from a little painting and kickboard installation. We finally - after a whole year - had a tiler come and do the splashback. I don't know why I waited so long! I had debated for a long time about doing it myself like last time but there were a few too many tricky cuts around the rangehood and the windowsill and it was all just a bit in the too-hard basket... So last week they came and made it all pretty and now it just feels so complete. And this is Annika and I in it, celebrating this fact. Well not really, but we do look happy, don't we? She wasn't at all happy for me to take this picture though, hence her being in it - she was very grizzly and in no mood to be put down. So rather than listen to all the screaming while I attempted to play model AND photographer, she joined in. It turned out rather blurry but I'm cool with that. 

I'll show you more of this space later, but the reason for the picture was for a little interview I thought I'd share with you. My good friend Natalie has a relatively newish blog called The Indigo Crew where she writes about life with her three kids - crafts, adventures, books, brands and more. She has so many great ideas and a beautiful aesthetic - you should go and check it out and be inspired. Nat has recently started a couple of new series on her blog, chatting to fellow mothers and creatives she's discovered on Instagram and beyond. She kicked the series off with Courtney Adamo from Babyccino Kids and I was happy to follow (though what an act to follow!) - answering 10 questions covering my childhood, my present and the future. I talk about my teenage self's career plans to something I've learnt to something I thought I'd never do (oh that would be yelling at my kids! Eek!). You can have a little read here and be sure to check back Tuesdays to see who else she has in store - I know she has a few good ones up her sleeve! She's also started to chat to the creatives behind great brands, such as Dee Purdy behind gorgeous clothing label Une Belle Epoque - their gorgeous linen Can Can tops get a workout at our place by Imogen and Annika! I was surprised and impressed to discover the label is her side project and she has a busy career in finance - learning things like that make me want to light a fire under my butt and get myself inspired to make my dreams come true (though pinning the actual dream down is kind of difficult at the moment!). Read more about Dee and her lovely label here

And just for fun, here are a couple more (blurry!) shots from that day... The sun was streaming through the back doors, which was lovely, but it wreaked havoc on the image of the stool legs (they're actually back!) Have a great weekend!

the kitchen renovation: another update

So two things that have still not happened: 1. My baby has not been born. 2. My kitchen is not finished. No real surprise there with either of them, though! Baby is now four days overdue and just when I think things might be kicking into gear, they stop and it's back to just UGH. The kitchen on the other hand, is getting closer. The windows went in a while back, then the plasterer finally came and fixed the walls and then finally came back to sand and then the electrician after a few delays managed to get the rangehood in and so all the major work is now done. HURRAH! So it's just up to us now to paint, sand and stain the floors and put the fridge in the right space. Oh and tile the splashback - it's just going to be the simple white subway tiles again - same as the bathroom for a bit of consistency. And also because I just love them. I did it myself last time, so here's hoping I'll be able to do a smaller area just as well.


At this stage my plan is just to tile under the windows and up to the rangehood - the tradies kept asking if I was planning to tile on the wall to the left as well but I just can't imagine that looking great having one wall tiled and the other not. Your thoughts? 

I was worried the windows might look funny being so small, but I'm so glad I went with windows on either side of the rangehood and not walls. And cheers to the builders to suggesting we square-set the windows and not architrave them as was originally planned - I questioned the squishiness of it and they came up with some other options - don't always think you HAVE to stick to plan A. It was worth the very long wait! Architraves would have looked so busy and weird between the wall and the pantry. 


And on the other side of the space is a black wall - Dulux Domino. It needs a second coat and a serious touch up thanks to the disastrous painter's tape I used. I have used millions of them now and this one was just terrible (Unipro?) - not sure if it was just a bad batch or what but it just might as well have not been used. I'm trying a Japanese washi-tape version for the glass doors - will let you know how we go with those once they're done. 

We're pretty exhausted in the home DIY department at the moment - a few storms in the past few weeks brought to light an existing problem we never noticed before: the roof leaks. Always good. It used to just leak against the back wall and wasn't noticeable at all (well we never noticed it - just assumed it was wet from the TERRIBLE patio job that someone erected out the back before we bought the house. The whole thing might as well not be there - water comes in everywhere) but since the doors have now replaced the wall, when it leaked it was leaking onto our doors, over the top of them and inside. We freaked out about our unprimed doors warping and everything being ruined and got priming ASAP once they dried. The builders made a few trial-and-error fixes (there were a few things it could have been!) and a few rain storms later, we're no longer leaking. Yay! Doors are still only primed though.... We'll get to it when baby arrives. Well Steve might - he's been my painter lately (bathroom needs one more coat!) and the cubbyhouse builder. And the hardware stalker. It's been weird  NOT being the person to hit the hardware for timber or paint and other bits and pieces... I kinda miss it. But honestly, I'm struggling to walk now - sore back, broken toe (I nearly did the splits in the rain a few weeks back - if my toe hadn't stopped me, am pretty sure I'd have broken legs and given birth on the ground. Or something. At least the baby would have been here...) and huge baby belly = awkward. 


Nordic Taburet Counter Stool, Click On Furniture // Tractor Stool, Freedom // Replica Tolix, Everywhere

We also finally decided on stools for the kitchen island - there were a few options. I had my heart set on some Danish-style timber ones I saw on Instagram ($$$) Then I saw the price - $325 each. Considering we need 4 of them, it was never going to happen. Then I fell for the Freedom tractor stools ($$) but there is several months wait. Steve found some $15 timber stools at a shop near his work - FIFTEEN DOLLARS EACH!!!!!!! But then decided he'd prefer something metal so we're back to the Tolix ($). He loves them, I love them, so it's settled. I've seen some absolute bargain ones at The Reject Shop and at Mitre 10 for less than $40 each so the hunt is on. For the price of one tractor stool or half a Taburet, I can get all four. Which in my clever mind means I have saved so much money I can spend it on more frivolous, pretty things like this collapsible copper basket I fell for from Dear September. Fruit bowl, perhaps? 


In other renovating news, I picked up the latest Real Living mag last night and was looking forward to the kitchen and bathroom special (despite having already done them both!) and I was, well... disappointed. I just didn't feel there was anything helpful in there at all - aside from the tips in Deb's letter. The pics were pretty, yes. But just pretty. Not totally practical. Too trendy. Too expensive. Too... unrealistic. I'm not here to pick on magazines - I love them! ESPECIALLY Real Living - I still think of it as my baby. But it's not what it was meant to be anymore and while I love the direction it's going for prettiness and gorgeous covers, I feel there is a big gap in the market again for real tips/real-life living/real budgets/real needs. Pinterest and blogs have caused mags to up their game - I have no doubt. But usually only in terms of inspiring images. And to be perfectly honest, I've seen projects in the mags that I've already seen on Pinterest. And as for great information, I get it all now from endless google and blog searches because I find I just don't believe top interior designers are speaking to me when they reveal their "top tips". I have come across the odd great tip every now and then, but I just can't relate most of them or their work. And one more rant: one would think only architects, interior designers/stylists, graphic and fashion designers or shop owners are the only people with nice homes! Bit tired of seeing the same old designery interiors - surely there are teachers or police officers or something out there who have some taste and creativity!

And so long story short, when I eventually do the final reveal of the bathroom and kitchen, I'm also going to write some helpful things I learnt along the way. I'll include prices and contacts and links and honest reviews of products. And if you have specific questions or things you'd like to know about for your own upcoming reno, please ask away and I'll see if I can address those too. Let me know in the comments what you'd like to know about the process. 

Fingers crossed my next post will be an introduction to our newest addition! One can only hope.... 

{top three images by Belinda Graham for The Happy Home}

the kitchen renovation: progress report

Guys, I have a new kitchen. And I'm thrilled. It's not quite done - the windows are sitting in the boot of my car (do you not keep your windows in YOUR boot?!) and there is a whole lot of newly plastered walls screaming out to be painted, there is no rangehood yet - or even wall to put the rangehood on - and my fridge is still hanging out on the wrong side of the room. BUT. I have a dishwasher, and sink with running water, lights complete with a dimmer installed, a cooktop that is magically fast and so much better than I thought it'd be (I just went with the look of it, but it turns out the function of an induction cooktop is pretty tops too) and handles (opening the cabinets and drawers without handles became quite the competitive sport) and a beautiful slab of Quantum Quartz on my three-metre island bench. I love how it's coming together - want a peek? Just ignore the chicken breast waiting to be chopped and the general crap that is hanging around - I just took some snaps while I actually thought about it.

I painted the island the other day (British Paints Rhino Grey) and it's made a huge difference to the space and really tied in the black cast iron hardware and matte black lights to the grey flecks of the benchtop. I really need some stools, but the kids are not going to let the absence of higher seats stop them from sitting at the island - they just kneel on the chairs! 

 I'm still undecided about the colour of the cabinet doors and whether I need to paint them or not. I'm leaning towards not as they don't bug me constantly and it's only certain light that it looks pink - I'll wait till it's completely done before working that one out! In these close-up shots, they look totally fine!
 I really love the knobs. They're from Restoration Online and for just $4.50 each, they're heavy cast iron and great quality and I am so glad the Ikea handles I was going to get were not in stock and I was forced to search elsewhere.


The lights from Wayfair are another fave. And because our house is so open to the street (we have a big window which will eventually be replaced with a whole wall of glass doors and windows), we knew we'd be in a bit of a fishbowl so installed a dimmer switch on the lights just to tone down the "HELLO HERE WE ARE"ness of the space. Yes we could close the blinds earlier, but we much prefer the open feel and the kids are always outside until the last possible second before bedtime anyway! We centred them over the island and one is pretty much smack over the centre of the sink, which I was worried would look weird, but all is good. I love the slight industrial feel, matte black coating and especially the chain over the electrical cable. 

One day the view from this angle should be really nice - white subway tile splashback, two windows flanking a rangehood, some timber shelves and nice stools.... One day!

And now.... painting! Whoo hoo. I have lots to paint - including the bathroom still. Might make the undercoat a Wednesday job when there are no children in the house to "help" me! The walls, doors, ceilings and architraves will be Dulux Lexicon quarter strength like the rest of the house, but I'm planning to do one wall Dulux Domino (the same black I used in my old bedroom). And slap a nice big gallery wall above my Parker sideboard that is currently home to some of my clothes in our bedroom. I'll show you some inspiration for that tomorrow. And in other exciting news, the kids are in their proper rooms (Zak has his own room and the girls are sharing) and we're feeling much less cramped and - dare I say it - slightly more organised for the first time in months! Such a foreign feeling! Now if I can just sort out some clothing storage (no rooms have wardrobes and we no longer have a linen cupboard either. Eek) I'll be even happier!


the kitchen renovation: moodboard
When we first looked at buying houses, I knew exactly how I wanted my kitchen to look - charcoal cabinets, grey or white/grey marble-style counters, open shelving instead of wall cabinets, white subway tile... And then I started to actually plan the kitchen properly for this space and changed my mind about pretty much all of that, save the subway tile which will probably still get a run. I did know I didn't want all white. I LOVE white, but I needed some kind of contrast, some texture, some natural elements. It was always going to be an Ikea kitchen - I was happy with the one we installed in our last house, so planned to do it again, with better doors and a few features that might make it look less "Ikea kitchen" if possible. Not that there is anything wrong with that! I just like to add my own touches. Funnily enough, I ended up buying more from Ikea than last time (this time I bought the appliances as well!), but we went to a local supplier for the stone benchtop (which was installed yesterday!) and online for the lights and knobs. So here are the nuts and bolts of the space in picture moodboard form, and below, some of the ways I'd like to introduce some wood to warm it up.

1. Elverdam mixer tap, Ikea I don't quite get the point of the pull-out taps. I know those who have them couldn't live without them, but like gas, I've never had it so don't know what I'm missing! So I chose the one that didn't pull out! I love the gooseneck shape and the white handle which just gives it a little something extra.

2. Ramsjo doors in white/Faktum cabinets, Ikea The amount of Google searches I've done that involved the words "Ikea" "kitchen" "ramsjo" "painting" borders on crazy. I wanted the wooden doors. I wanted them to be white. I wanted a shaker-ish style door. All avenues led to the Ramsjo. But they're kind of pink in certain light. I knew this. But I was happy to one day paint them if need be. And then I got them home and saw them with our whitewashed floors and white walls and thought they looked ok - not too pink! But in the actual kitchen with the walls unpainted, no windows in and the floors all yellow and horribly stained still, they kind of looked pink. Sigh. But I think once it's all done, it'll be fine so I'm not touching them until then.

3. Quantum Quartz Turino, Central Coast Granite The cabinet door situation did throw out my benchtop selection a little. It was hard to pair the colours up and really get a feel for how it would look when the door colour was not definite. I really wanted a white shaker door, marble-look counter with a dark grey panelled island. In the end, we scrapped the marble-style stone tops due to them looking a little too white overall, and went with something with a few different colours that seem to cover the colour of the doors, the grey we're painting the panelling on the island, and the whites in the room. It was also $1500 less than the marble lookalike, which meant we could go for the chunky 4cm thickness. I kept being drawn to that one the most and I just prayed it was as nice in full length as the sample was - it's hard to tell with such a small piece. And luckily, it looks great!

4. Easy VJ pine panelling in British Paints Rhino Grey We loved this look so much in our bedroom, we wanted to replicate it somewhere else in the house - the kitchen island was the perfect space! This time it's vertical and was installed by our builders so is perfect, unlike our DIY job! The island is three metres long and runs through the centre of the home - so the dark panel will be seen from the back and two ends. Should be nice.

5. Cafe Lighting Orlando One Light Pendant, Wayfair I wasn't really sure what I wanted above the island until I saw these lights - they were IT. I would have loved to have the ones with the gold on the inside but I felt it might clash a little with all the silver tones in the room. I know it doesn't need to be matchy matchy, but I'm just not the bravest when it comes to that. So clean crisp white it was. They arrived today and I LOVE them. The shape, the metal chain over the cord and the size (they were bigger than I thought) is all perfect. Can't wait to see them hanging over the bench - the electrician comes on Saturday! So you know: Wayfair approached me last year about possibly one day doing a product review. I looked at several online places for lights and then searched through the billions of lights on Wayfair, fell in love with these black ones and approached Wayfair about reviewing those. They agreed and so were gifted to me, but I am being completely honest when I say I would have bought them anyway.

6. Framtid OV5 Oven, Ikea I'm not really obsessed with buying the top the line appliances. I don't fully understand what a pyrolytic oven is and I don't care (sounds like something pyromaniacs might like). Something about making it easier to clean? You know what? An hour out of my life to clean my oven every now and then is totally worth saving the extra at least $1000 it would have cost to buy one. I'm not the best cook, so as long as it works, I'm happy. So I looked around at other stores to buy appliances and just got over it quickly - I wanted something simple looking and stylish, so I chose this oven purely because I felt it was the best looking. And not purely fan-forced, which from experience I have decided I don't like. Plus I could have it delivered along with the dishwasher, cooktop and rest of the cabinetry I bought from Ikea. Done!

7. Cast iron stepped cupboard knobs in Antique Finish, Restoration Online I was debating the drawer pulls and simple black knobs from Ikea for this kitchen but as fate would have it, they were out of them when I went. So I had a little looky online for cabinets and stumbled upon these. I've ordered them so I'm hoping they'll be as nice in real life as they are on the computer screen! I think they'll fit well with the black pendants and dark flecks in the benchtop...

8. Luftig HW650 rangehood, Ikea (annoyingly, this is not online or I'd have bought it the first time I went to Ikea - I didn't know it existed until I was there that day, but hadn't transferred enough money for that and the sink, which I also didn't realise existed). This was purely about look - I wanted the triangular rangehood on the wall between two windows. There weren't a billion of them in the 60cm width though, so I thought I'd found it at Masters. I went to grab it one night along with an undermount sink and discovered it was a special order and would take three weeks. I didn't have three weeks (well, it turns out I will have lots more than three weeks, because the range won't go in until the windows do and the wall is patched which is still a fortnight at least away), but I didn't know that at the time, so I decided another Ikea run was in order and I grabbed this one and the Bredskar sink (which I got in a smaller size - also not on the website).

9. Nutid HIN4T Induction Hob, Ikea Again, I clearly know nothing about appliances. I bought this one purely because it had no knobs and looked so nice all flat and glassy. Little did I know, it can only fit into a benchtop that is at least 3.8mm thick and you can't use any pots and pans on it - you need to use special induction pans. I didn't know this until I'd got it home and opened it up - after I'd already ordered my benchtop. Let me just say I'm glad we went with the 4mm benchtop.... The pots and pans are another story. My Christmas present from my parents were a brand new set of Smith + Nobel pots and pans - worth $400. I used them of course straight away and have since discovered - after casually reading through the hob's info for something else the electrician asked me - that they can't be used as don't have a magnetic bottom. GRRRR. I guess I will be trying my hand at selling something on eBay rather than buying for once...

So what's the layout like? Oh glad you asked - I have this handy screencap of my Ikea planner that I somehow managed to do in the early hours of the morning I went down to Sydney and bought it all. Have I mentioned I'm a last-minute kind of girl? I've had this design pretty much from the start - we were ripping through the whole house so you could see from front to back - the kitchen was staying in the middle and so a large island bench was a must - it'd also create two thoroughfares through the kitchen area. I would have loved to have nothing on the island, but the length of the wall between the two walls that were removed wouldn't allow it AND a cooktop. So the sink is in the island - luckily, it's big enough to handle a sink and doesn't cramp its style too much. So without further ado...


 It's actually not that big a kitchen. Take away the sink, oven and dishwasher and I have a pantry, two sets of drawers, two full cabinets and one half a cabinet as the microwave is going on the top shelf (inside the cupboard behind the door, not built into the kitchen. I don't like microwaves on display). There are no wall cabinets or shelves going along that wall as the rangehood will be flanked by two windows. So that's it! Finger's crossed everything fits ok - I'm planning to spend the rest of today putting things away.

To add a tiny bit of extra space and to fill the gap above the fridge, we're planning to find some nice chunky rustic timber and put up a floating shelf above the fridge. I also think while black, white and grey is tops, there needs to be some warmth and natural elements in the space, so I am very inspired by these images below. I'd love some timber stools for the benchtop (at this very moment, I'm sitting on Imogen's Stokke highchair at the island - the only chair in our house high enough!) and maybe some timber shadow boxes on the small jut-out wall near the fridge for spices or pretty bowls. I'm also totally in love with the JUICE letters below and want to attempt to make some letter shelves for the kids rooms. If all else fails with the barstool search, I'll likely grab some replica Tolix stools in the aluminium colour - I spotted some at Mitre 10 for $35!


So we are slowly getting there - it's nice to not have to use an old cupboard door as my benchtop anymore! And if the plumber turns up like he said he would today, we should have a tap and useable sink by this afternoon - hooray! My poor bathroom sink will be happy about that!

Collages by me, last collage made from images via Goop (top), Doug & Elissa (right) and unknown (bottom).
a renovation update
Gee, surprise, surprise, I've been MIA yet again. But this time I have a good excuse. Our renovations have started! Quite major ones too, really. We've knocked down walls, jackhammered up concrete laundry floors, installed new French doors, planned, bought and half-installed a kitchen, finished a bathroom, sanded and whitewashed floors, painted bedrooms and generally made a complete mess of the place. Well, technically, "we" was limited to the last three things on the list. The rest was done by the professionals. But basically, we've been incredibly busy. Want to see what we're up to now? Check out the progress pics of the last two weeks below...

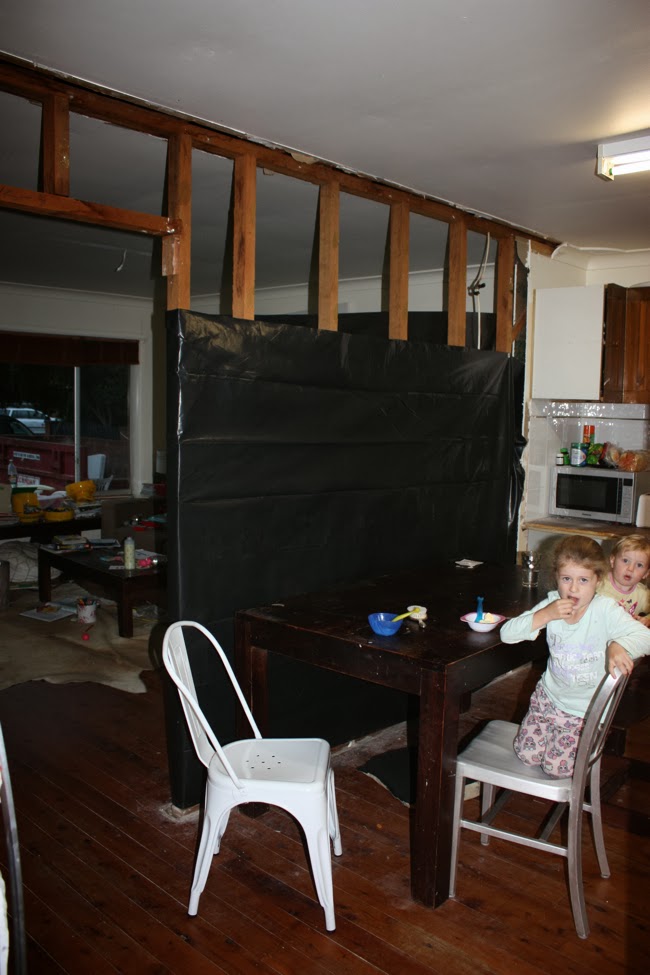
 This lovely wall was the one separating the living room (pictured) from the kitchen and dining. The weird white patch is my paint sample (Dulux Lexicon quarter strength) I've used throughout the house so far and will continue to do so. Two days before demolition day, we relaxed the "do not draw on walls" rule and let the kids go nuts. They had a ball! Was a little sad to see it sitting at the bottom of the skip bin!
 Day one: skip bin in the driveway (it is STILL THERE!!!!!!), this wall was first to be hit by the hammers. Due to electricity all dangly, the builders wrapped it up in plastic for the night so we didn't get the true effect of the missing wall just yet.

 The other side of the room - the fridge has been moved to the hallway (convenient!) and the glass door to the left of the fridge alcove takes you to the old laundry and a weird little thoroughfare room/closed in verandah we used as a playroom for approximately 2 weeks before it became a storage space for whatever room we were emptying to paint/sand floors in. Now it is all gone.

 Day two: The laundry was ripped out and the poor young apprentices spent a good portion of their day jackhammering the concrete. Not only was it needed to create these lines for the floor trusses, the whole slab was higher than the floor in the kitchen so to continue to floor all the way through (which we wanted to do - cost a bomb more, but so worth it). So it had to be attacked several times to get it to the right height. We left the house that day...

 Other side of the laundry - up until we renovated the bathroom, the bottom left used to be our toilet. SO glad that horrid thing is gone. The white concrete you can see in front of the grey is the floor of the tiny square we called the playroom. Really it was an enclosed verandah and thoroughfare to the backyard. It used to look like this (below) before I ripped up the lino and painted the floor in an attempt to make it half decent for the kids to play in. They didn't get long to do so though as we moved everything forward and it ended up being stacked with wardrobes, shelves and toys with no room to play as we worked on the bedrooms.


Day three: the builders patched the floor (and it was quite a bit of work! I'd never leave the floor like this, but I quite like the patchwork-style of it. As a bit of a novelty.
Right now it's all covered in plaster, but still looks cool. Each piece was individually cut by hand with a small saw, sometimes split in two and then removed. The new piece was cut to size and hammered in on such an angle they could slot it into the pieces beside it. It didn't look easy and took the best part of a whole day...
 
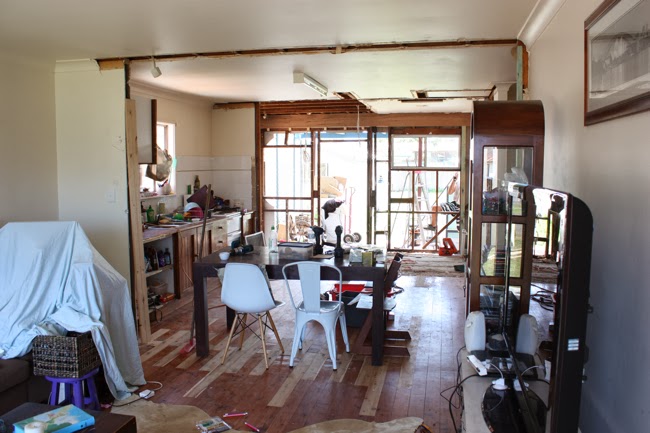
 We loved having that wall down. It was nice to sit at the table and see outside and watch the sailboats sail past. Note the fridge in the hallway and the bookshelf housing crockery from the pantry.

 The kitchen corner kitchen cabinet was chopped in half and turned into a small galley style. This same length will be half the new kitchen with a huge 3-metre island running parrallel to it in the centre of the room.
 Day four: Bye bye back wall. That light came streaming in once the old back wall was taken away. The ceiling in the playroom was lower than the rest of the house so was also ripped out. We decided to keep the window in the playroom for now - eventually it will replaced with a tall and narrow one, but I'm glad we didn't just seal it up for now. I love my light.

 We had a lovely orange tarp as our back wall for a couple of nights. First night was fine; second night was windy so it flapped all night which was loud and annoying!

 A pulled-back shot from the living room. We can see from front yard to back!

 I've lost count of what day this was... But the doors are in! We changed our minds at the last minute - we were going to go with sliding doors in the centre and fixed panes on either side. But then realised we loved French doors and so went back to our original plan - full light French doors in the centre and two full-light French doors fixed as windows on either side. Our builder built the giant frame and fitted everything in and then they somehow managed to install it into the almost-4-metre gap they created!

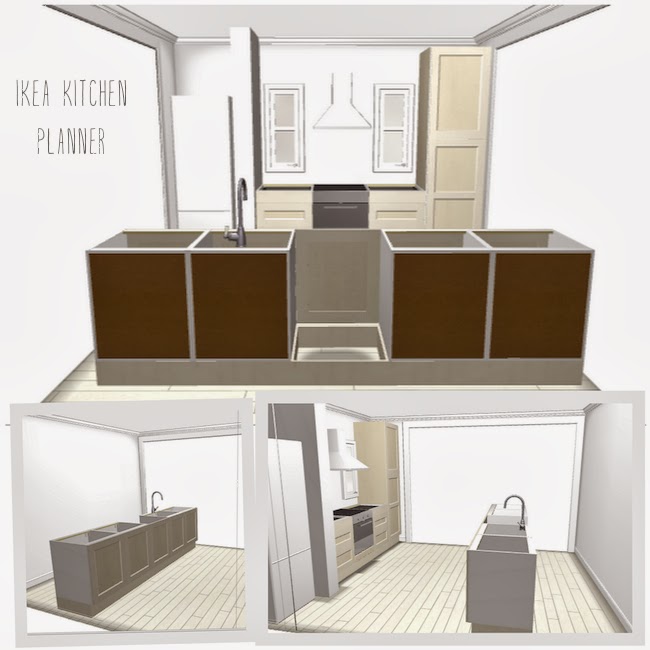
 Our kitchen purchase was so simple - I created the room at 1.30am using Ikea's kitchen planner, saved it to their system and went down to Sydney later that day at an actual normal hour hoping it didn't look as though a drunk person had created it. (For the record I wasn't drunk - I don't drink and am pregnant anyway. Just super-tired). I waltzed in, got someone straight away who opened up my plan, helped me make a few tiny additions and subtractions, printed out the list and sent me on my way to the checkout. Last time we bought an Ikea kitchen I paid for it, then had to wait 2 hours for my order to be "picked". Then I had to wheel 5 bloody trolleys laden with kitchen cabinets and fittings to the home delivery counter a few metres away and organised delivery a week later. This time, I paid for it and walked over to the home delivery counter with a massive smile on my face after being told the warehouse will pick it all and deliver it on Saturday - 4 days away. Perfect! And then the perfection ended - I knew it was too good to be true. I had my incredibly convenient (not) time slot of sometime between 8am and 6pm on Saturday. We hung around, went fishing, all the time waiting for the call an hour before they were to deliver it (as promised). I started to wonder if they didn't actually call me and just arrived and when noone was home, left again. At 5pm they called: "Oh I"m sorry, the delivery company stuffed up and it won't be delivered today." Grr. There went my plans to build the cabinets on Sunday... Monday it arrived at 6pm and was stacked in Layla and Immy's room which was empty until I had to empty the cupboards of the old kitchen so it could be ripped out! This is what it looks like now with a few more drawers to build....
 Our new bathroom! I haven't even showed it to you properly yet, have I? Well here is a sneak peek, complete with dirty shower screen. I haven't shown you yet because the finishing touch - painting - has been put on hold until the kids are all back in their proper rooms and the house is kind of back to normal again. Then I'll get onto finishing the bathroom... It's currently being used as our kitchen sink - and will be for another week still...

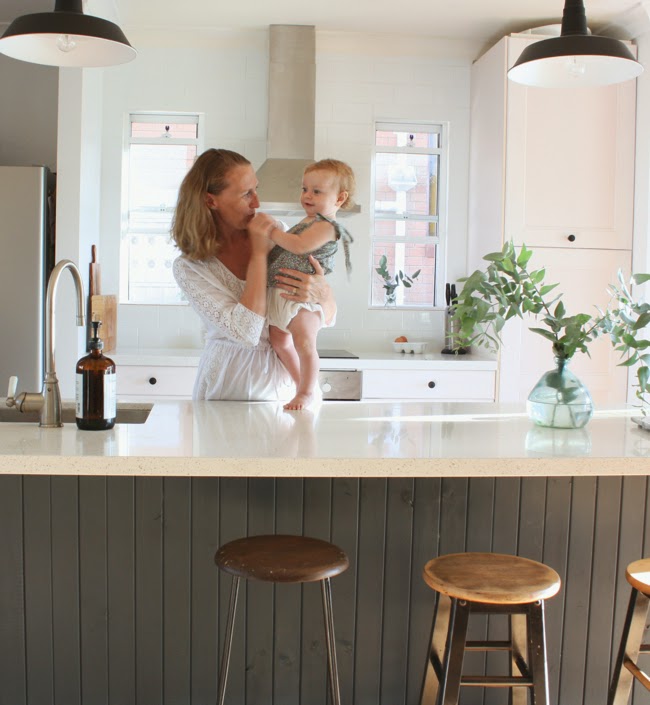
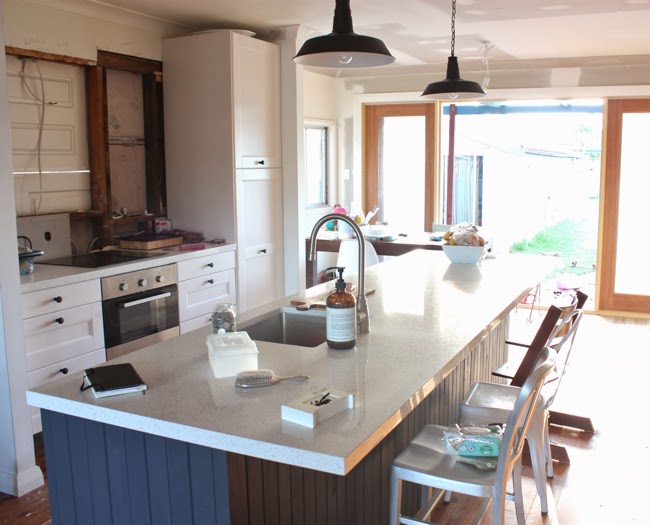
 Our island is in!!! For as long as I can remember, all I've wanted is a huge kitchen island the kids can eat, play, create, craft and do homework at. I made sure it happened in this house! And because I love the panelled wall in our bedroom, I decided to panel the back and sides of the island too. And by I, I mean our builders of course. They made it super neat and tidy and I can't wait to finish it all off with a coat or two of dark paint... The unattractive hole in the wall has since been patched, but the doors nailed to the opening will remain for another three weeks while my two windows are on order. They will sit on either side of the rangehood.

 A look from the back door to the front. The kitchen cabinets in the living room have since moved into place between the newly created wall for the fridge alcove and the older cut-back wall that was between the kitchen and playroom, below. All the other crap is still in place. Ugh.

I won't even show you what the state of the bedrooms are - put it this way, I packed suitcases  and stored our clothes in the cabin and we are living out of the washing basked in my bedroom for the moment. That washing basket, however, is overflowing and has spillled out all over the floor. Just for fun - and because I have nothing else to do - Immy likes to fling the contents of the basket all around the room. I love her for it...

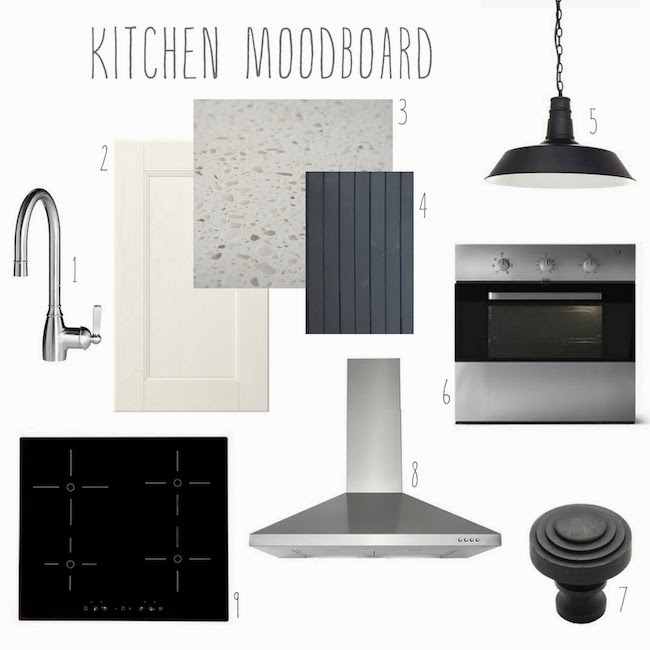
And there you have it - a pictorial progress report! The plasterer is coming back to sand and make a gigantic mess in the morning (yay!), the electrician comes Thursday and then hopefully the stone benchtop is installed by Wednesday next week. Then it's just up to the plumber to hook everything up and the waiting game of the windows.... I can't wait to see it finished! I absolutely love how much this work has transformed our house. It looks and feels totally different. And I love it all. I'll be back later with a moodboard for the kitchen and another kitchen update.

Oh and HAPPY NEW YEAR! Hope 2014 is your best year yet!

{All images by Belinda Graham for The Happy Home}