{The reno files} A real-life renovation guide: introduction
reno3.jpg

Two years in August, we contacted a local draftsman to talk about drawing up plans for our house extension. TWO YEARS AGO. Ever heard this old gem - that renovations always take twice as long and cost twice as much as you planned for? Yeah, so far, the first part is true. We're yet to find out about the other part because, well, we’re only a few weeks in and while the bills have been frequent and hefty, we really won’t know final costs for a while! We were originally told if all went smoothly we could have our plans drawn up, submitted and approved through council in a maximum of 12 weeks. Hahahahahahahaha. No. Not even close. It took us a year to do plans, soooo many months in council, stuff-ups and surprises and life stuff too. And so two years after showing our little sketches to the draftsman, here we are, seeing them come to life. It’s SO exciting - we might even be able to host Christmas here this year (I’ve had to swap with my sisters for the past three years!) But I shouldn’t get ahead of myself - read those first few sentences again!

I’m so tempted to throw in all the pics of the stages so far (although if you follow me on

Instagram

I’ve been posting daily pics and images of what’s going on in InstaStories), but I really want to document this properly from start to finish - how we came up with the design, what we spent upfront before we even started building, the process of going through council and the build itself. And so, I’m going to have to get cracking on writing to catch up to where we’re at! Bare with me… So what ARE we doing? Well, we're extending out and up - creating a family room with laundry and workshop on the ground floor and an attic library and master bedroom in the high-pitched roof. You can read more our plans

here

.

When we bought this house we knew we were going to extend it - it was just a matter of how. If we had gone with the very first suggestion by a builder who lived a few doors down, it would have been a very different home to the one we're creating now! And it would have been very wrong for us. So there is a lot to the "live in a house for a while before you touch it" advice… 

Part way through our council-approval-stage delay,

Real Living magazine

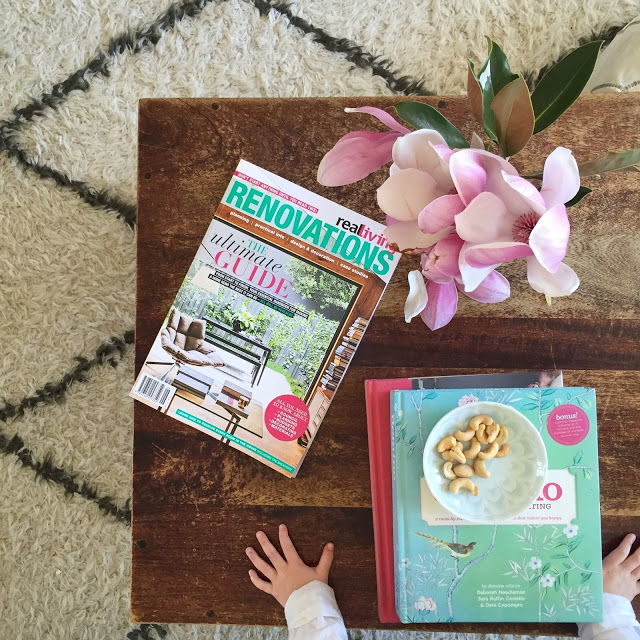
asked me to write an entire magazine on renovating. I'd been planning to contact them about writing again - it'd been a while since I’d done any kind of work and I was feeling like the time was right. In the end, they got me first and I agreed, although about two weeks in I started to regret it as it was a HUGE job - and not exactly easing back into work, which I'd envisioned I'd be doing! But once I got past the "OMG where do I start?!" I started to enjoy it. I've always been annoyed by magazine articles on renovation or those bathroom and kitchen guides - I never feel as though they cover the right things. It's all so general or about aesthetics - or with huge budgets And don’t even get my started on renovation shows… I can’t watch them. And I LIVE for this stuff. I’ll only watch the UK version of Grand Designs - that’s it! Anyway, for the reno guide, I was pretty much given free reign to write about what I wanted to write about as long as it fitted within their general section guides. And so I did. I wrote 40,000 words on renovating - why you should, where to start, who to contact, what things might cost, how long things might take, things you should or shouldn't do, how to shop, how to deal with tradies, how to decorate, how to be environmentally savvy, all things about windows, doors, floors, paint, hardware, lights, all the rooms, outside/inside and behind the scenes. I tried to include meaty information like measurements for placement of bathroom and kitchen fittings, who to contact for what job (you don't always need a builder or architect), what you'll be out of pocket before you even lift a hammer, and even if going the home builder route is for you. Basically, it was a 101 in renovating. It was something I always wanted to write and something I always wanted to read.

Real Living Renovations

is out now in newsagents and I do hope it's helpful! 

And yet despite a whole magazine dedicated to it, I couldn’t cover everything - and I couldn’t get specific on something that is going to be entirely different one build to the next. And so, as a kind of extension (ha! see what I did there?) on that magazine, I thought I'd outline our own project here - what we've gone through, how long things took, what they cost, our problems and solutions, the good, the bad, the ugly! We are going the owner/builder route ourselves and one step further than that: Steve is literally building it! After being over his career for a while (politics/media!!!!! Not surprising!), he resigned late last year to start a whole new career: carpentery! We've often longed for a more relaxed, simple lifestyle - less stress, timeless skills, more time together... We came to that great understanding that earning a lot of money didn’t mean happiness, so we changed our stars. We spoke to the carpenter we planned to use for our build and he was so keen for Steve to work on our house - he was happy to show him the ropes and build up his skills with a view to being accredited down the track via prior learning. In the end, his apprentice left and he offered Steve some work before our place was ready to go, so Steve donned the tools earlier this year and has been his trusty sidekick ever since, starting from scratch in a new career. I'm so proud - and so excited he will have such a huge part in building our extension. 

Another thing we’ll be doing - and documenting - is paying for everything ourselves. It’s kind of bugged me for a long time now that somewhere along the line, blogs equal freebies - especially in the DIY/home arena. I often can’t look past the fact that someone got something for free and that’s why it is in their house. I can appreciate people earning money from their blog or turning it into their career and I really enjoy a lot of the blogs that do accept freebies - some of my faves manage to work it well. But that side of things is not for me. I’d love to some day, somehow, monetise my blog, but the current model with sponsorships/gifts/freebies etc isn’t for me anymore.

I stopped it all a while back

and while it’s tempting sometimes to say yes to things that are offered - especially if it really is something I’d probably buy - I don’t feel it’s a true reflection of what renovating/decorating/home-making is about. And I’m all for sharing the real side of things. So if it comes down to real budgets, real compromises are going to be made. And by real I don't mean hundreds of thousands of dollars and top-end everything. Ours is ballparked at $170k but that is for a huge extension, second storey, laundry, two decks and balcony. I know in parts of Sydney that money might buy you a couple of decks and a bathroom renovation. I also know in other parts of Australia it could buy you a beautiful house. I'm not saying it's a budget renovation, I'm just saying our money is going to have to work really hard to get what we want. We aren't taking out a loan or extending our mortgage, it's our hard-earned money going back into our home with hard physical work (well, Steve's hard physical work!!), careful choices and lots of compromises. And because of that - our home is not going to be Pinterest perfect. And it’s not going to be designery, too tricky or trendy. It’ll just be a home that reflects our wants and needs - and that is what everyone’s home should be: a reflection of the people who live there. Not those who live in photoshopped pages of magazines! Because no-one lives in those rooms as they're portrayed. I KNOW what goes on before a house makes it into a magazine - lots of props (I recall a house having its entire contents replaced for a photoshoot!) rearranging, seeking of good angles, professional photographers and stylists, editing, cropping, photoshopping… Don’t ever feel bad you don’t measure up. All that applies to Instagram images of people’s homes and lives too, by the way! Consider them inspiration and use them to inspire your own spin on it. It's taken me a while, but that's what I do now.

I figure by sharing our journey, you might pick up something (or pick up what NOT to do on some occasions! That’s good too!) to help you on your own renovation journey. If you have something you’re particularly keen on knowing about, please let me know. I’ll try to work it in somewhere! Next up: working out the design….

Belinda x

PS:

Speaking about renovations... For a guide to renovating your bathroom, head

here

.

 One day I'll get around to doing a kitchen one too. One day!

Beautifying and highlighting imperfections in the home
gold leaf kintsugi 1.jpg

If you've read my waffle for the past 9 and a half years (seriously, that is how long I've been blogging. That is scary.) you'll know how I'm not big on perfection. Perfect spaces, perfect people, perfect things - they are not real to me. Add a little wonkiness to a house, some mess to the waves of someone's hair or a few tell-tale signs of age on items and they become more interesting to me. And usually more beautiful. Recently I read about Kintsugi - a Japanese art form that sees damaged items repaired with gold (or silver). Rather than throw away broken crockery or smooth over cracks in rendered walls, the imperfections are highlighted with gold leaf and sealed with lacquer, creating an interesting feature of a home or allowing a favourite plate to continue dishing out your meals - with a little bling on the side. The method humanises things - giving them some attention, patching them up and letting them continue on their merry way rather than just giving up on them at the first sign of a breakdown. It's giving even the most ho-hum items a history, a story and a chance to shine. It's such a sweet sentiment in this throwaway world, and because I love gold leaf - and maybe because Marie Kondo and her whole "socks have feelings too" craziness has rubbed off on me more than I thought - I had to try it out on some damaged things I had around the house. 

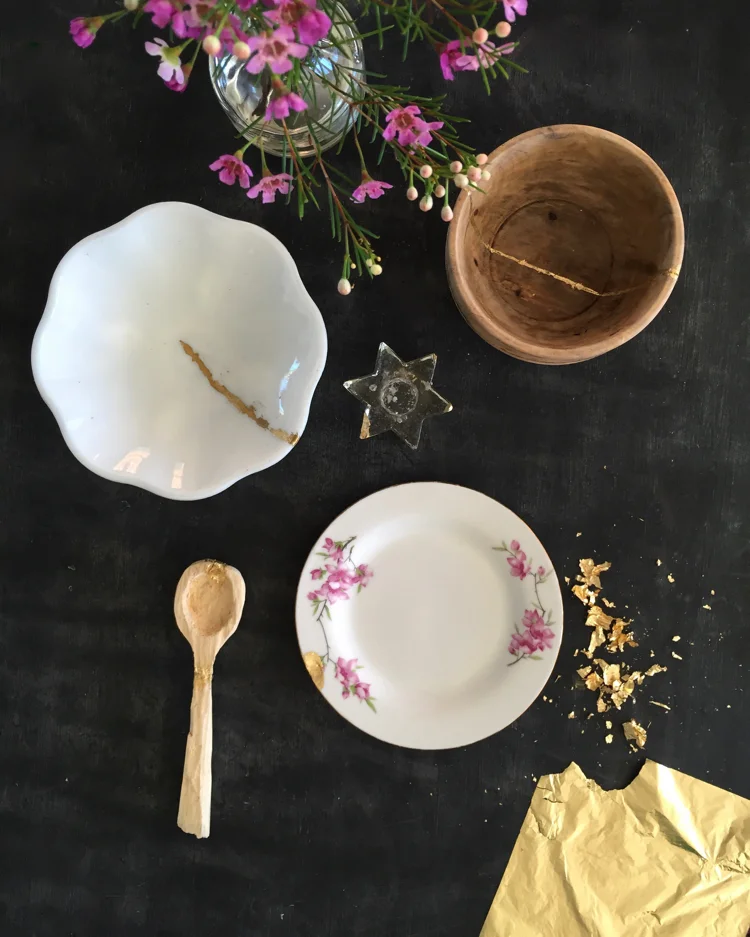
First up: the small wooden bowl Steve found in the water on one of our walks a few years ago. It was green and gooey on one side and stunk like goodness knows what, but we thought it might clean up ok. So we soaked it and scrubbed it and it did clean up beautifully - but it was cracked in several places. So in went the size, and in went the gold leaf. It's certainly not the neatest follow-the-line I've ever done, but that's the whole point about this method: imperfections can be beautiful, and the wonkiness just gives it even more character. I love the glimmer on the rustic wood - I could never tire of that combo! 

Next, I hit up the kitchen cabinet where my Nana's dishes were. The pink floral plate was part of a few sets my grandparents bought many decades ago for my mum's wedding. I had a full set once - complete with tea cups and saucers - and accidentally threw the wrong box on the charity pile (and managed to keep a whole bunch of unwanted crap on the keep pile instead! Eek!) so I only have a few pieces left. I knew there was a big chip out of one of the side plates, so a few minutes later that chip looked a whole lot chipper (sorry) with its new gold coat - especially since the plate is gold-rimmed. I also blinged up a few op-shop pieces - several chips in a little star candlestick and the tiniest crack in a milk-glass bowl.

I actually thought that was all I had when a few nights later I decided to try my hand at making a wooden spoon out of a piece of driftwood and a lino-carving tool. Obviously, neither of these things are going to work as well as, say, proper wood and a real wood-carving knife. But I wanted to see what it was like to do before I invested in a proper knife and so had a play. It was strangely addictive - I drew a shape, cut and carved with the rounded lino tool (and yes, cut myself several times) and in an hour or so had a pretty cool shaped spoon. Except a knot was right where the rounded end of the spoon was and soon became a hole! And then, while wondering when I should quit it on the handle -  SNAP! I wondered too long so the whole thing broke. I originally threw it on the compost, but decided to keep my very first attempt at spoon carving because I really enjoyed doing it - even if it was never going to be able to be used as a spoon, was not even close to smooth and had a hole in a crucial part of it. Steve glued it together for me and I gave it the gold treatment. Now, rather than just being a weird unfinished, holey, broken wooden spoon, it's got a story, a history and a little bit of prettiness about it. I love that!

It's kind of an addictive idea - I can't help look around the house and see other imperfections I'd love to highlight somehow: holes in the floorboards from old knots, cracks in the concrete driveway... I'm completely in love with both of these ideas, above, from the

original article

I read about kintsugi. The art form is not just about gold leaf, but also patching things with similar materials but in different shapes, colours or patterns - such as adding the odd patterned tile in a bathroom wall of solid colour tiles. It really is giving the less-than-perfect aspects of a home some time in the spotlight to shine. And who doesn't like that occasionally?

{Top 3 images by Belinda Graham for The Happy Home. Concrete and gold leaf image is an part of an installation called Seam by Catherine Bertolt via

Workplace Gallery

; Patchwork timber floorboard via

Material Valley

}

DIY: wooden peg star fairy wand
fairy wand .jpg

With a gold-sequin tutu, gold wings and gold butterfly mask, my golden girl Immy was just missing a gold fairy wand to complete her outfit. You see, she had a

silver

fairy wand. And apparently, one cannot mix their metallics when dressing as a fairy. So inspired by

Sofia's so-pretty gold Christmas stars

made from wooden pegs (do you remember making wooden peg crafts at school? I made a trivet), I decided to adapt it slightly to include a stick for a wand. And now her look is complete! So we celebrated with a sprinkle of gold confetti and glitter because, well, why not! Want to DIY? Here's how... (I do apologise for my lack of images. I thought I'd taken more...) 

Toolkit:

  • 8 wooden pegs
  • Two long thin and flat paddle pop sticks (I honestly don't know if that's what they are. They are from one of those dollar store craft shops.)
  • Glue (I used craft glue to stick the pegs together but a hot glue gun to create the star)
  • Gold spray paint (I will never buy cheap spray paint again. I've tried a whole bunch of paints and usually stick to Rustoleum or White Knight.)

How to:

Step 1:

Remove the metal spring holding the two peg pieces together by gently twisting the peg until it starts to pop off (haha "pop off" - my kids would be so happy I wrote that).

Step 2:

Flip the two halves of the peg so the outside edges are now flush against each other. Glue together ensuring the two halves are in perfect alignment. Repeat until seven of the eight pegs have been glued inside-out. Leave to dry.

Step 3:

Glue the two paddle pop sticks together. Leave to dry.

Step 4:

Sandwich the paddle pop stick between the last peg halves and glue in place. You might want to use a hot glue gun here too for extra hold.

Step 5:

Using four of the pegs, create a cross by matching the diagonal edges of the end of the peg together. They will fit naturally. Glue together with a hot glue gun.

Step 6:

In the gaps of the cross, glue in another peg, creating a star wand. Spray paint and leave to dry. Wave around and watch pretend magic happen!

I'm not sure how long it will last, but it's fun for now. So much fun that Immy had to take it on our walk the other day after I took these pictures. It was getting late and cold so she quickly winterised her outfit (below). Ha!

Kids craft DIY: food and flora collage
collage.jpg

My favourite crafts are the ones where you can use what you have already - or use things from a little hunt and gather around the neighbourhood. Then it's a drawn-out craft with bonus exercise! I was looking at the bow pasta the other day thinking how cute it would look as a little bow tie on a illustration. And so today's craft idea was born! I told Layla what I was thinking and she was in - she went around and picked some flowers and greenery from the garden, thought up her scenario of a ballet dancer and asked me to draw the girl. She then glued on the tutu from flower petals, painted a tree ("an autumn tree") and after changing her mind from rice snow to glitter snow, she then painted an ice rink and drew some ice skates onto her ballet shoes! She thought the couple would look pretty smart with a top hat with a feather and framed with some elbow pasta. I love watching her in creative mode and seeing what she comes up with. We hunted around the craft cupboard for little beads and other sequins and had fun getting creative - I had to make one too! This kind of craft is really only limited by your imagination - so many things in your garden, your pantry and craft cupboard can be used: beads, gum nuts, sticks, tiny stones, foil, confetti, leaves, feathers, sequins, buttons... you get the idea. I think a really small version could be sweet made up as gift tags or a birthday card. And while white or coloured backgrounds would look great too, I can't help but think things stand out a little more on the black cardboard. And happily, the watercolours worked too - although a little less bright than they'd appear on a white background.

Toolkit:

Black cardboard

White ink pen

Glue

Paintbrush

Watercolours -

these ones

are the best (Spotlight also sells it). I must have bought 5 of these palettes over the past couple of years. The colours are pretty and they dry so quickly - I've even used them on the

wall of my home

.

An assortment of food, flora and any other crafty bits and pieces you can gather together

Easy how to:

Step 1:

Suggest a scenario or have your child think something up. Draw the basics - a simple person is easy and they can "dress" them and fill in their surroundings. A house is also a good one.

Step 2:

Let them go! Let them paint, glue, rearrange and sprinkle till their heart's content. The pasta can be painted before or after it's glued in place. It's really not worth of a step-by-step, is it?! Here are  some close ups of the others...

Kids craft DIY: paper plate lion mask
lion mask.jpg

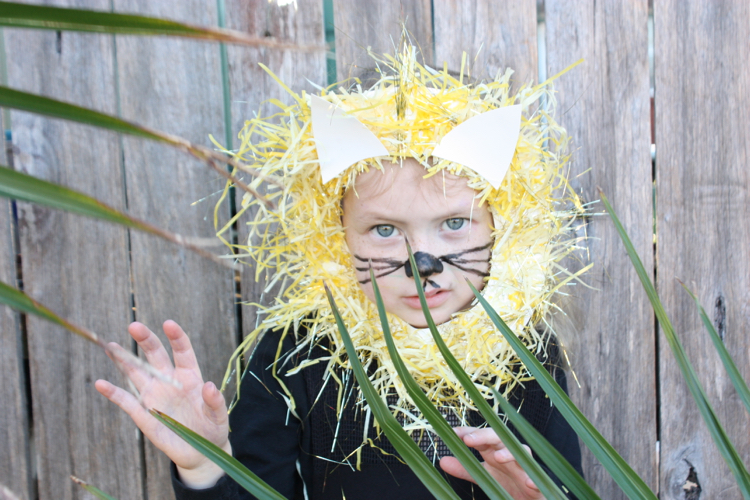
I have this great love of paper plates. I use them for everything. A pile of 50 goes really, really quickly in my house. Aside from parties, they're often folded up into little boxes for mini craft storage or picnic packaging, cut up into gift tags or just used as craft paper - they kids draw on them and cut them up into all sorts of random things - and then we even make good use of the off-cuts for maths homework working out! They're also so brilliant for crafts. I'm running a free kids craft stand at an upcoming fete and decided pretty quickly I'd create some crafts around paper plates. One of them will be these lion masks for the younger kids. We'll most likely shred some newspaper or whatever paper we can get our hands on for the fete, but these shades of tissue paper and tinsel are perfect for a lion's mane. 

Toolkit:

Paper plate

Shredded tissue paper and tinsel (from dollar stores)

Glue

Single hole punch (or just use the scalpel)

Scissors

Scalpel

Elastic

Face paint or eyeliner pencil

Easy how-to:

Step 1: 

Cut around the base of the paper plate with the scalpel so you have a hole.

Step 2:

 Using the circle you've just cut out, cut two ears and set aside.

Step 3:

 Punch a hole on either side of the plate. Thread and tie your elastic to create a mask.

Step 4:

 Cut your shredded tissue paper and tinsel into smaller pieces so they're not too much longer than the edge of the plate. Mix them up a little for a more "natural" mane! Glue the face of the paper plate and stick the mane in place.

Step 5:

 Glue the ears in place.

Step 6: 

Gently cut around the inside of the mask to trim away excess "hair" so it doesn't tickle your child's face! Be careful not to snip through the elastic.

Step 7:

 Leave to dry in the sun and in the meantime, paint on a nose and some whiskers. Once the glue is dry, pop the mask on your child's head. The plate can be popped outwards to sit nicer on their face. ROAAR!