
Our bathroom renovation - before and after

Almost a year to the date we ripped out our old bathroom (I excel at taking my sweet time doing things), I'm finally showing you the after! I'm making this a two-part post because I really want to share with you some tips and things I learnt from the reno and if I can dig out the receipts, I can tell you exactly what it cost too! I'd be curious as to what you think it cost if anyone is keen to guess a ballpark.
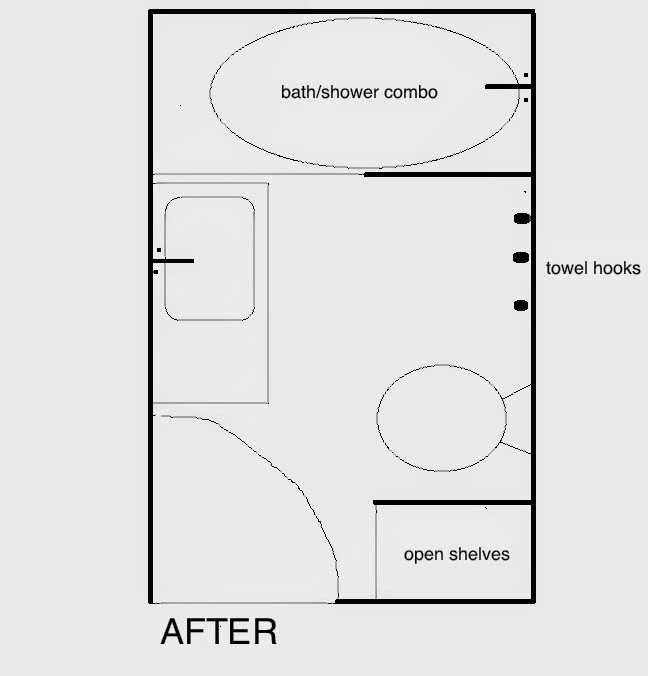
When we bought this house, we knew we'd never move the bathroom, but eventually add another. The original bathroom just housed a shower, bath and vanity - the toilet was in the laundry. It was old, original and rotten in parts - it was awful to shower in (a large percentage of tiles had broken and fallen away); awful to bathe in (slow to fill; gross and rough base) and awful to be in. Here it is just after we moved in!
 It's just so attractive, isn't it? When it came to renovating it, we worked with the space we had. Steve had just three requests: a great rain-style showerhead; a bath that was quick to fill and a toilet roll holder that was vertical so the roll wouldn't fall off. I was (happily!) left to nut out the details: I wanted something clean and simple, light and white. The space needed to squeeze in a decent-sized vanity with benchspace, a bath, a shower, a toilet, great storage, a laundry baskey, kids stool for reaching the vanity (which we still don't actually have, but do have the space for!) and towel hanging space for six people. Seems like a lot of requests for a tiny space, but we managed to get it all in and even ended up with a fair bit of free space which was a nice. Not quite enough to swing a cat, but maybe a kitten!
 It's just so attractive, isn't it? When it came to renovating it, we worked with the space we had. Steve had just three requests: a great rain-style showerhead; a bath that was quick to fill and a toilet roll holder that was vertical so the roll wouldn't fall off. I was (happily!) left to nut out the details: I wanted something clean and simple, light and white. The space needed to squeeze in a decent-sized vanity with benchspace, a bath, a shower, a toilet, great storage, a laundry baskey, kids stool for reaching the vanity (which we still don't actually have, but do have the space for!) and towel hanging space for six people. Seems like a lot of requests for a tiny space, but we managed to get it all in and even ended up with a fair bit of free space which was a nice. Not quite enough to swing a cat, but maybe a kitten!
The only main structural change to this space was ripping out the tiny, useless pantry that was opened from the kitchen and replacing it with built-in open shelving. Originally, I figured we'd just use the space that was there and just have a very narrow, tall shelf but the builder said he had to rip it all out anyway so we could choose our widths and heights of the shelf. In order to fit a toilet in (I chose the smallest I could find that wasn't plastic), we had to put the shower over the bath - not a major problem, but it'd have been nice to have two separate utilities and I've always wanted a freestanding bath, but it wasn't to be...
As for looks, subway tile was always going to feature - I know many who
don't like it, but when it's white tile and white grout, I'm happy. I
don't like it any other way. I wanted a dark grey floor that matched my whitewashed floors, chunky built-in shelving, at least one tiled display shelf in the shower, a frameless glass shower screen that swivelled and a wall-hung vanity to avoid water damage from the floor (every old bathroom I've ever had the pleasure of living with had water damage to the bottom of the vanity!) and nice-looking taps. Here's what we ended up with:

The only thing I'd maybe do differently is the tiled lip around the bath edge. Water sits here and stains the grout easily. I don't know what else we should have done, but I'd probably have looked into it more if I'd known that would happen!

The wall-hung vanity has enough space to clean underneath easily and because it's off the floor, tricks you into thinking it's smaller than it looks. But it's a good size - the cupboard houses a hairdryer, straightener, clippers, soaps, toothpaste, extra toiletries. I'm also so pleased the handles are the built-in variety (Steve's choice - he done good!) because I am pretty sure everyone's knees and thighs would have been corked several on any handles sticking out! We deliberately stopped the tile at that height on this wall and the opposite wall - there was no reason to continue it to the ceiling like it is in the shower. It's also decision made by budget - it would have cost several hundred dollars more to tile the whole wall. I think I made it one row too high (the kids can't see themselves yet! But they'll grow!) but it's a minor, minor oops. We could choose where we wanted to place the basin and I deliberately chose to the right to allow for maximum benchspace and also I thought it might have felt a little cramped being so close to the door. I'm still planning to add a fence-paling frame around the mirror. One day!

I had these taps picked out before anything else in my
bathroom. But I struggled to find a vanity I liked that had three holes - they all had one hole for a mixer tap. But I don't like mixer taps in the bathroom - especially in the bath/shower because the kids can bump them so easily and are highly likely to play with it because it's easy to do so! I also didn't want to do two different tap styles so I spoke to the plumber and we decided to mount them on the wall over an above-sink basin with no hole! I think it turned out for the best!

The drawers have more than enough room for my minimal amount of cosmetics, sunscreen, and other bits and bobs (I've come a long way from my days at Cosmopolitan magazine where I had boxes full of skincare and cosmetics from our beauty sales! And I hardly used any of it!)

Towel hooks were the only way we'd get enough hanging space for everyone, but even then I had to cut the number of hooks on the wall back to three instead of four (didn't want them hanging over the loo!) There are two more on the back of the door - Steve likes to hang his towel over the shower screen so we all still get a hook each! Soon, we'll have an ensuite and it'll be the kids bathroom, so plenty of space for just the four of them.

Just quietly, I also like the look of towels hanging on hooks rather than on towel rails. It's always nice when aesthetics are a by-product of practicality! I've had these flower towels (from Le Souk) for about six years and they're still in good nick. The grey Turkish towel is from a new local shop called Honey I'm Home.

My nice chunky built-in shelves. I'm so glad they're here - when we knocked through the other side of the house for the kitchen, we removed the only linen cupboard. With no built-in wardrobes and minimal kitchen space, this is the only other storage space in the house. So the top shelf houses sheets and pillowcases (extra doonas, pillows and blankets are in the cabin). Next is towel storage - all rolled up! Then there is a wire basket for toilet paper, bubble bath and nappy-rash creams, cotton wool and cleaning products (it's a Kmart basket I spraypainted black). Behind the basket is more toilet paper and tissue boxes; to the side is hand towels and face washers. Lastly, a laundry hamper slides into the space perfectly for dirty clothes (though it is SUCH a battle getting those kids to put their clothes into it!). Looking out into the kitchen - notice my half-done floor? This is how it's staying until we extend - the floor needs to be continued for a little bit in the dining room and I am NOT doing it now and then redoing it in a few months time! So all painting of ceilings/walls/floors and architraves in that area has ground to a halt!

The wire basket and laundry hamper are both from Kmart. Can't go wrong with black (well, the wire basket was silver, but I painted it!)

Inside the basket - baby/kids shampoo and bubble bath/oils, tub scrub, cotton wool and loo paper. We don't need or use a lot of stuff around here. I'll let you know how that changes when my girls become teenagers! Eek!

Towels always look better rolled up. Our beach towels go here too, but were (conveniently!) line-drying after swimming when I took these pics.
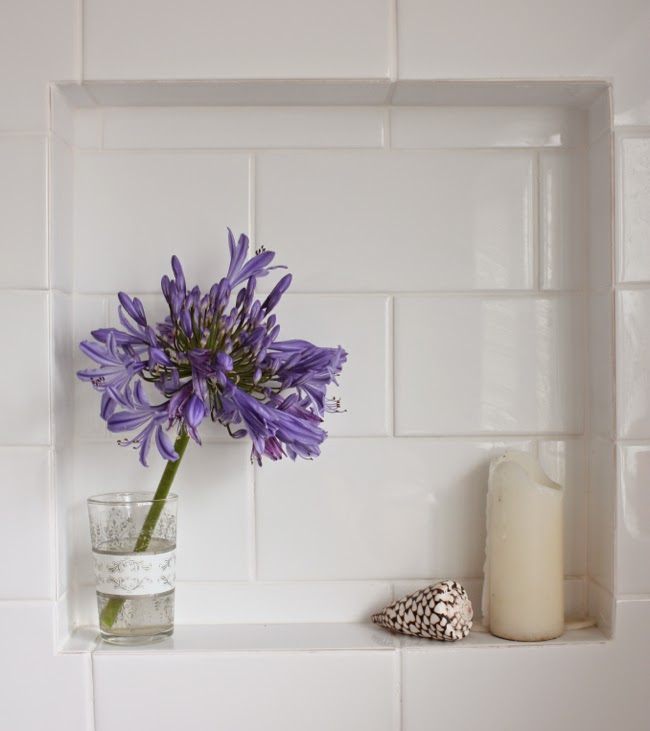
The nook! It's at the other end of the shower. I thought I'd use it for shampoo and conditioner storage, but they go on the windowsill and instead I usually display some greenery from our walks in a tiny bottle, a candle and usually my all-purpose mint spray. For these pics I switched it up with the first agapanthus to bloom in my garden!
That's about it! I'll write a little bathroom renovation guide in coming days for those who could do with some tricks and tips! I'm trying to work out the look of our ensuite bathroom in our loft, I can't imagine me veering too far from this kind of look. I'm a bit of a one-trick pony! But really, I can't see this going out of style quickly - there is nothing trendy here that will date. Plus there aren't too many patterns or colours or shapes or... stuff! No need to be tricky for the sake of it or for the sake of a DIY project. Pretty and practical has always been my mantra...x
Sources:
Taps: Mondella Resonance Chrome bath set, $75, Bunnings
Vanity: benchtop (Quantum Quartz in Alpine White), basin: (Siato above-counter basin) and vanirt (BTH Noah Wall WF-900 vanity), $620 for all three, Eagles Plumbing
Floor tiles: Bellazza floor tile in Mystic Granite, $10.45 for a box of 11, Bunnings
Wall tiles: Johnson Waringa White subway tile, 58c each, Bunnings
Showerhead: Estilo Round shower head, $29, Bunnings
Toilet roll holder: Caroma Cosmo Chrome toilet roll holder, $25, Bunnings