Posts tagged bathroom
A real, hopefully helpful, honest guide to renovating your bathroom


Renovating and decorating is so personal. One person's penchant for trends is another's personal time-warpy nightmare back to when they lived with it the first time (kind of like the '80s fashion that keeps coming back!). Regardless of what you choose to outfit your bathroom, the process of renovating it can be pretty overwhelming. I thought I'd outline some of the things I considered, some problems that appeared, some tips and tricks I learnt along the way. I've now renovated two bathrooms (our current house / our old house) and one laundry/WC and am by no means an expert by any stretch of the imagination. But I do think I have some tips to share. And I like to share; I have a blog, don't I?! I also spoke to Dana of House*Tweaking who recently revealed her bathroom renovation and has some good advice too, because it's nice to hear from others who've been through the same thing. This is by no means all the information ever on renovating a bathroom, but it might help in some small way - even if it's tip on taking a million photos so you have some back-up for tradies who might have lost all their important notes written on the wall to an over-zealous plasterer...

Finding your tradies
Ask anyone - ANYONE - who has ever used a tradesman for anything ever and they will say "oh so-and-so came out to give me a quote and I never heard from them again." I have no answer for this annoying trait, but maybe it's in their manual... So yes, you will likely get someone who will waste your time, but you need to find one first, right? Here are a few tips.

Ask around and get recommendations. We knew no one when we renovated our first house - not a soul - so we asked the local hardware store and they gave us the name of a carpenter who ended up doing our whole house. The smaller local hardwares are best - they know their stuff and they work closely with regular, local tradespeople who aren't just after the cheapest price for materials.

You don't need to use a dedicated bathroom place. I don't know much about them but I would hazard a guess that they know what they're doing BUT you'll pay for it.

A good carpenter/builder will know good plumbers, electricians, tilers, plasters - anyone else you'll need for the job. So one recommendation will usually result in a whole team. Same goes the opposite way - if you've ever used a plumber or electrician for another job, they may know a good builder for the job too. These types of tradies are usually contracted by various builders so they get to know them well - who pays them well, treats them well, is organised, who produces good work. They're one of the best sources of recommendations.

Try to have a good idea of what you want before you get someone out. We never got anyone out for any work until we knew exactly what we wanted. But we welcomed their advice and suggestions and even made some of their changes.

The right person for the job is not just the best price. You want someone who is willing to work with you to get you what YOU want - not what THEY want (and there will be some who only want to do what they want. We had a tiler who didn't want to do a feature cause it was in the too-hard basket; another builder didn't like our layout and wanted to change it to something that was less work for him!). We chose our carpenter for our first house because he tried his best to bring our plans to life, even when others had dismissed them (We wanted a certain layout with a door in the middle of a wall. Two builders looked at my sketch and said it couldn't be done. The carpenter actually measured the space and suggested we use a narrower-than-normal door. He got the job.)

Coming up with a layout
This may be dependent on budget, but if you have the luxury to have the space redesigned, here are some things to think about while playing interior designer...


Invest in grid paper and make each square equal 50cm in real life. That's what I do with everything! Draw up your space and measure your existing shower/bath/vanity/toilet space as a guide so you know what you're playing with.

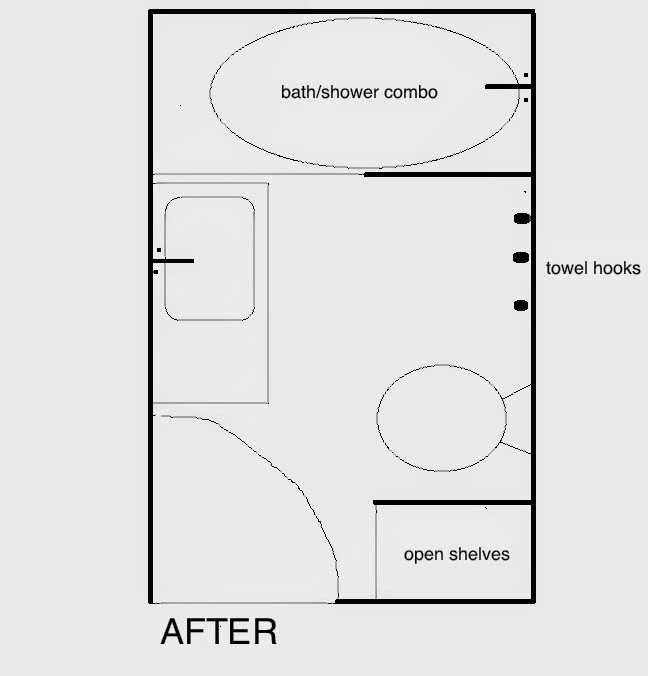
Think about moving utilities to make the best layout for you. A narrow bathroom works well with the bath or shower at the far end.

Consider moving the wet spaces furthest from the door - I don't know about you, but my kids make a huge wet mess every time they have a bath. Toilet trips and teeth brushing meant wet feet right before bed in our old bathroom because they had to pass the bath to get to the sink and their socks (in winter) would get all wet. Or they'd slip over. Now, the vanity is right at the door and the bath/shower beyond it. It hasn't stopped the problem completely, but it's much, much better.

Don't let windows throw you. We have twice now kept the window in the shower/bath - tilers can waterproof and tile around them and with semi-opaque glass or window adhesive, there is no problem with privacy!

Think about moving the door. A door in the centre of a wall gives you another option for a small bathroom - you can place the toilet on one side and the vanity on the other of the same wall with the door in the middle. Open the door so it opens to the side with the toilet. We did this in our first bathroom renovation, pictured above. My bathroom MO hasn't changed much, has it?!

Consider gaps between things like vanities and baths or the wall. You don't want any gaps that you can't get your hand/arm into to clean. Trust me, it's gross. Either leave enough space to get in there or have no gap. There are all sorts of nasties lurking in those hard-to-reach places.

Make sure you really have space for everything - seriously, write a list of all that you require to be in your bathroom that will take up floorspace: laundry basket, bin, toilet brush, toilet paper holder, a stool for the kids... and then make sure you have enough room for it all!

Give yourself enough room on either side of the toilet - I'd allocate a minimum of 80cm to a toilet, with it centred in that space. It's best to place it in a corner so it's close to a wall so the toilet-roll holder is in line with your arm while you're, um, sitting on the throne, rather than having to bend around and do gymnastics to the wall behind you. We have 40cm from the edge of the toilet to the wall on one side and 70cm from the other edge of the toilet to the bath on the other. The smaller space allows a spot for a bin and toilet brush while the bigger space has a tree trunk (temporarily - when I get my butt into gear and go to Ikea, it will house a step stool for the kids.)

Give yourself plenty of space in front of the toilet too - our vanity is 60cm away from it, allowing a thoroughfare for little people to wander in (!), but I wouldn't want to go any closer to it.

Give careful thought to which end you want your showerscreen/taps - you want to make sure you have enough clearance to get in and out of the shower - especially if there is a vanity nearby. You also need to be careful your screen won't smash into anything if you're going to have it swivel, like ours does. Ours opens onto the wall, which is ideal.

Consider a recessed sliding door into the room if space is tight - no door swing might allow you a bigger vanity or more toilet room. You can also request a narrower door or have it slightly shaved if need be. Sometimes a few millimetres can make a huge difference to something fitting perfectly or your layout changing completely!

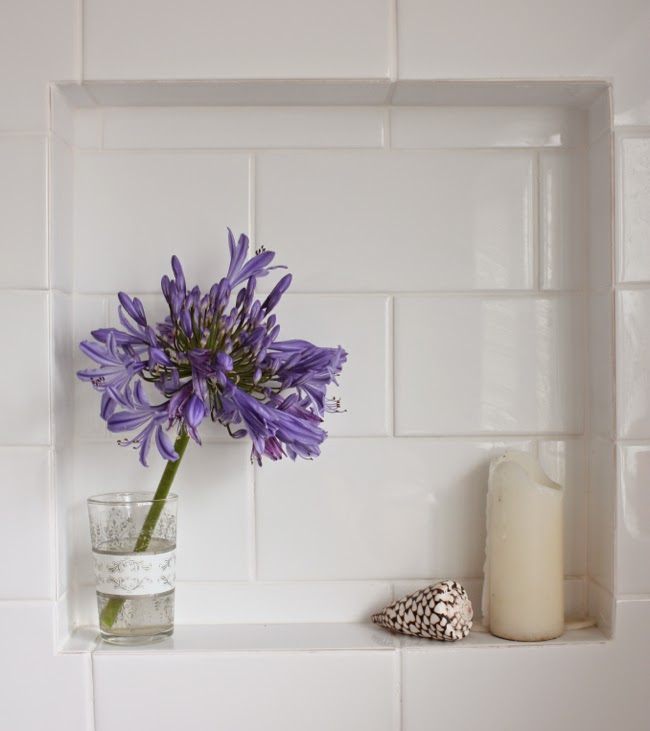
Don't waste your chance to squeeze in extra storage - recessed wall cabinets might be your thing, try built-in shelving like we did for towels and toilet paper or, if you only have space for a small vanity, think about building in a small ledge above the vanity for toiletries you use everyday but have no space on the sink for.

Making it pretty and practical
You've pinned and stalked Instagram for snippets of bathroom styles you love. Now for a reality check: don't be blinded by the prettiness of some pictures - magazines or styled images always remove signs of life (shampoo/soap/toilet roll stash/scales/toilet brushes etc) so what you're seeing is not necessarily how your space will look should you replicate it. Instead, take note of the things you find repeating themselves in your fave pictures (colour, natural materials, a particular tile) and see if you can work that into your space. Practical AND pretty is what you want. Not just pretty. Here are a few ways you may be able to get it.


Think of different places for your electrical outlets. We placed ours behind the door - it's close enough to the vanity but out of reach of children and water and can't be seen day-to-day. If you rarely use electronics in the bathroom, this might be ideal - or perhaps in a wall cabinet.

Really think about the colour of the grout - especially on the floor. White tiles with white grout on the floor is just asking for trouble. You might as well just choose grey grout because it will inevitably turn grey anyway! My personal preference is a darker floor with lighter walls. If you like the look of darker bathrooms (and we're gearing towards the dark side for our ensuite), I'd still make the floor darker than the walls. I just think they look top-heavy if the walls are darker and it feels off balance. Again, personal opinion but one to consider.

Test your floor tiles at the store - natural stones with a bit of texture are less slippery than smooth tiles. Take a bottle of water with you and wipe a bit of water onto the tile and see how slippery they are. It's a small, not-perfect test but you'd be surprised how slippery they can be. And NEVER use wall tiles on the floor. You might read this with a crinkled-up "well DER" face but in our last rental, they had used the wall tiles all over the bathroom - including the floor. And we hit the deck more times than I'd like to remember. Plus they had cracked in several places on the floor - I'm only assuming here, but I wondered if wall tiles are thinner than floor tiles and this was the reason? Either way, I cursed that bathroom every time I used it!

Consider your showerscreen options Fixed, frameless shower screens are quite lovely to look at, but if you have a shower over your bath or have little kids, a showerscreen that swivels is a great idea. It still can be frameless for the invisible look, but the hinged style of it allows easy access to taps, bathing little ones and cleaning (you can rinse off the outside of it in the shower!

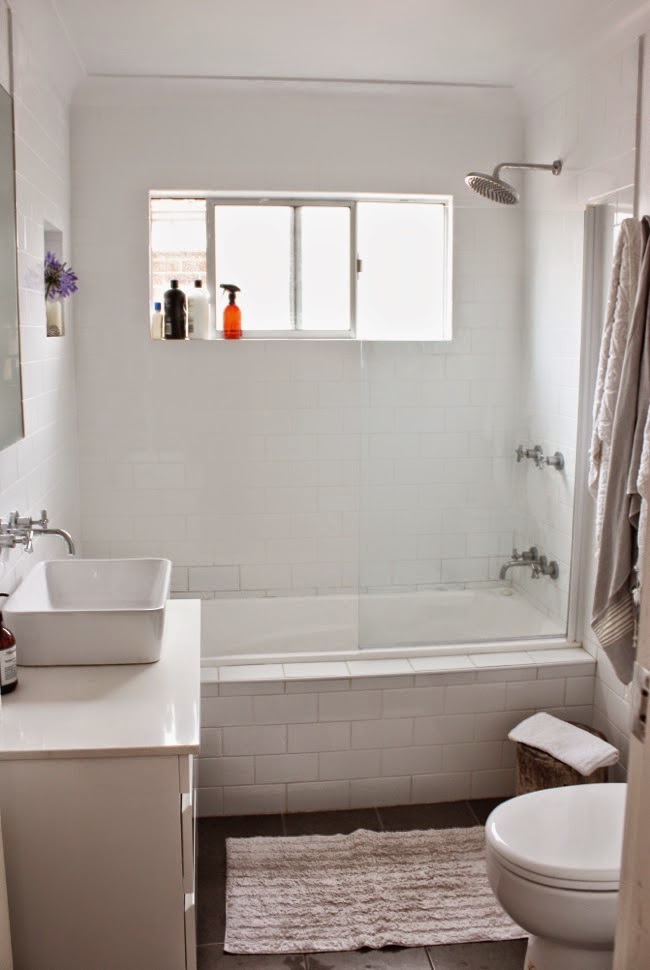
Avoid bath "shelves" When tiling around a bath, depending on the style, you might have the bath sit into a frame which could leave a little tiled "shelf" along the edge (see my picture at the top of the post for detail). This all sounds well and good in theory, but the water pools here like nothing else and the grout stains so easily. I'd ask your builder for other options.

Think about how the floor will match the floor in the rest of your home We chose a grey floor tile that worked well with our whitewashed floors. We're actually planning to resand the floors and stain them when we extend. I'll be choosing a cooler, grey-based stain to match for flow. Orangey pine floors might clash with cool-coloured tiles. Bring a sample tile home and check it in natural light and at night to see if it works. It's not one that can be easily fixed!

Think about what kind of sink you want and who is using it - I always wanted an above-counter sink. To me, it acts like a wall for items on the benchtop - handy when you have young children who are awesome at moving things around randomly and knocking things into the sink. So many times our toothbrush holder was knocked in - along with anything else sitting on the benchtop. It's seems a small annoyance, but appears to be big enough to warrant a change.

Mixers vs individual taps Mixer taps are pretty popular, but I don't like them in a bathroom. In the bath, they are so easy for kids to bump or play with, potentially causing burns. Steve's story about his childhood friend whose skin was burnt from a bathtub has haunted me, so they were out. I considered using one on the vanity but I wanted the same style tap throughout the bathroom.

The range of ready-made vanities might be limited depending on the style of taps you want. I wanted wall-hung taps to show off the cross style I chose with an above-counter basin. Could I easily find a vanity that had no holes in it for the taps? Nope! It was a challenge - most have one hole for a mixer tap or three for your standard-style taps. I was trying to get a good deal on eBay or a hardware store but was limited. In the end, I found BTH, which has a good range.

Tiling around a window ledge, but will cost you a fair bit more than standard tiling. This is due to them having to grind angles on each tile for the corners. Just so you know!

The smaller the tile, the higher the price! Not necessarily the tiles themselves, but apparently all tilers have a hatred for mosaic tiles, so they charge you for them! I was told the rule of thumb was: the smaller the tile, the higher the price to lay them per square metre. My subway tiles cost a fair bit more than regular square tiles would have; mosaics or smaller squares would have cost even more. Next time I think I'll choose gigantic tiles!

Tiling is surprisingly expensive. I'm not sure why this surprises me, but it does. Aside from the carpenter's bill, the tiler was the next expensive. His fee came in at around $2000. To cut costs, we only tiled to the ceiling around the shower area. The walls away from the wet area we did just above the tap line for the vanity. Then for the built-in shelving we just did a border tile near the floor. The bonus thing about doing a half wall of tiles in areas that don't need it is if you install a towel rail or hooks, you're not drilling through tile so they can be moved if you realise you need something different or in a different spot. It happens.

The bigger tile you use on the floor, the smaller amount of grout you need to clean! I'd balance out the large-style floor tiles with a smaller wall tile...

Heat lamps might not be the prettiest thing ever but if you decide against underfloor heating, they are so good. I won't shower without the heat on in winter - it really does make a difference. And you don't look up so no worries!

Discuss with the plumber where the showerhead will sit to ensure it's the right height for everyone. If someone in the family is above-average height (like Steve!), it might need to be installed higher than normal - especially if it's in a bath, which is always slightly higher than the floor level. You might also need a longer arm from the wall if it's a large-circumference showerhead (like our rainfall one) to ensure the right amout of clearance from the wall and so you don't need to angle the showerhead everytime you take a shower.

A few more top tips...
Some miscellaneous things I thought might also be of interest. Warning: poo talk is involved.

Water-saving bits can be removed I do my bit to help the environment but I REFUSE to have a terrible-flowing shower. We bought a rainfall showerhead and were so excited and then the first few showers were pathetic. And the bath took 24 years to run. I asked the plumber what could be done and he just said "I'll just remove the water-saving device in them." Five minutes later we had a fast-running bath and a heavenly rainfall showerhead. They are the only two taps I've removed them from, but a little luxury is good for the soul.

Take photographs of each stage of the renovation From demolition, to re-studding, to the plumbing bits fitted, images of the various stages can really help when small hiccups occur. It's amazing how often the photographs of the studs came in handy. When the time came to install the hooks, the builder's notification to themselves of where their stud was had been plastered over. And when the builders forgot to cut a hole for their electrican's cables for our oven in the kitchen, my photos helped the electrician work out where it was so the damage was minimal.

Plan ahead If you're going to install a towel rail or hooks for towels on a wall, have the builders put a stud or noggin in place where they'll go so it's not just screwed into the plasterboard.

Look at your toilet. Really look at it. I made the mistake of just buying the narrowest toilet I could find that didn't have plastic parts (I didn't want a plastic seat). But once it was all in and our bathroom was in working order we quickly discovered annoyances that has Steve and I hanging for a pristinely perfect toilet in our ensuite! Inspect the inside of it - you don't want an opening that is too small that waste will not be flushed out properly. I'd also avoid toilets with a bit of a "shelf" on the inside. Excuse my potty talk, but when you have small children who tend to do their business close to the front of the toilet, there are issues with their, um, "presents" collecting on the little shelf and not flushing properly, leaving lovely artwork-style marks and generally stinking up the place. It's like the toilets I came across a lot while in Germany. I hated those things! The best styles are bowl-style with a large opening at the base. And that's the end of the poo talk!

Baths - especially bath/shower combinations - will move over time. So keep in mind the grout might crack slightly after a bit of use and you may need to redo the grout and the silicone around the edges too. Mine needs to be done, I'm still working on finding some time to do that! 

Have the tiler look at the toilet base before he begins tiling - some require the tiles to be cut perfectly around the base as the plumbing IS the base, while other toilet's have a base that fits over the plumbing and therefore will cover the tiles.

Strange smells will be temporary Oh wait, I lied. A little more poo talk: you might discover a delightful (!!) sewerage smell while your bathroom is being renovated. This will disapper once the toilet is fitted with S-bends so just bear with it for a little while. (It's still gross).

SAVE vs SPLURGE
This is another one of those things people will debate about. MY opinion is this...
Save
Taps: All have water-saving devices these days and need to be made to meet a certain standard, so they're all going to be pretty similar. I bought our taps from Bunnings and they were the higher end of their range but still a lot more affordable than at a bathroom store.
Tiles: Tiles have a huge range of prices for the same kind of thing. I bought all my tiles from Bunnings and even the tilers suggested I get them there as they were a great price and a good tile. IF you want a particular tile or a feature wall of amazingness, then this would move into the splurge section. In my bathroom, we used simple styles so no need to pay through the teeth for them.
Toilets: Again, they need to meet standards and have water-ratings. I'd just avoid anything with a plastic seat/cistern.
Hardware: Towel rails, toilet-roll holder and hooks - I just can't justify spending a lot of these items. As long as the quality is good - they seem sturdy and look nice, does it really matter if they're bargain-priced?

Splurge
Vanity: This is your one real piece of furniture in the room, you want it to be a bit of a focus and nice looking so I'd buy a nice one. Ensure it's not going to blow out if it gets water-damage, so badly-sealed laminates (on edges) are not a great idea.
Custom fittings: Built-in shelves, recessed shelving or door changes can be huge game-changers to a space so are worth spending on.
Tiling: You might not have a choice! They're expensive! But we're glad we upped the budget to allow for the half walls of tiles on the vanity and toilet walls rather than just a floor border. It was worth it to us (plus - happier there are tiles behind a toilet rather than just a wall!)

BUT WAIT! THERE'S MORE!!!!!
I spoke to the lovely Dana from House*Tweaking - owner of this pretty space, below - for her top tips for renovating a bathroom. Here's someone else's perspective:


If possible, work with the current layout to keep costs down In a perfect world, I would have moved the tub / shower plumbing to the opposite wall but we saved $$ by keeping it in the original location.

Choose classic finishes for longevity Bathroom materials aren't the easiest to switch out (as opposed to, say, a pillow on a sofa). Subway tile, hexagon tile and/or penny rounds in neutral colours are good go-tos.

Take a risk! I had my heart set on a vintage cast iron tub set in a wood saddle base, but had no tutorial to follow and many people tried to talk us out of it. We made it up as we went along and somehow pulled it off (above). It's one of my favorite projects to date.

Choose your grout colour wisely Light grey or sandy-coloured floor grout is super family-friendly!

Information overload? You could play a drinking game for the number of times I said "consider" or "think"!! I do hope some of it's helpful. And I'm sure there are a million more tips and tricks to renovating and decorating a bathroom space effectively, but you'll come across some of them as you tackle it. And if you've already learnt some, feel free to share them in the comments section for those who are gathering as much information as they possibly can! If you're after more tips about renovating in general, try this post for some things I've learnt along the way.

{Top images by Belinda Graham for The Happy Home; bottom image by Dana Miller for House*Tweaking}
Our bathroom renovation - before and after

Almost a year to the date we ripped out our old bathroom (I excel at taking my sweet time doing things), I'm finally showing you the after! I'm making this a two-part post because I really want to share with you some tips and things I learnt from the reno and if I can dig out the receipts, I can tell you exactly what it cost too! I'd be curious as to what you think it cost if anyone is keen to guess a ballpark.

When we bought this house, we knew we'd never move the bathroom, but eventually add another. The original bathroom just housed a shower, bath and vanity - the toilet was in the laundry. It was old, original and rotten in parts - it was awful to shower in (a large percentage of tiles had broken and fallen away); awful to bathe in (slow to fill; gross and rough base) and awful to be in. Here it is just after we moved in!

It's just so attractive, isn't it? When it came to renovating it, we worked with the space we had. Steve had just three requests: a great rain-style showerhead; a bath that was quick to fill and a toilet roll holder that was vertical so the roll wouldn't fall off. I was (happily!) left to nut out the details: I wanted something clean and simple, light and white. The space needed to squeeze in a decent-sized vanity with benchspace, a bath, a shower, a toilet, great storage, a laundry baskey, kids stool for reaching the vanity (which we still don't actually have, but do have the space for!) and towel hanging space for six people. Seems like a lot of requests for a tiny space, but we managed to get it all in and even ended up with a fair bit of free space which was a nice. Not quite enough to swing a cat, but maybe a kitten!


The only main structural change to this space was ripping out the tiny, useless pantry that was opened from the kitchen and replacing it with built-in open shelving. Originally, I figured we'd just use the space that was there and just have a very narrow, tall shelf but the builder said he had to rip it all out anyway so we could choose our widths and heights of the shelf. In order to fit a toilet in (I chose the smallest I could find that wasn't plastic), we had to put the shower over the bath - not a major problem, but it'd have been nice to have two separate utilities and I've always wanted a freestanding bath, but it wasn't to be...

As for looks, subway tile was always going to feature - I know many who don't like it, but when it's white tile and white grout, I'm happy. I don't like it any other way. I wanted a dark grey floor that matched my whitewashed floors, chunky built-in shelving, at least one tiled display shelf in the shower, a frameless glass shower screen that swivelled and a wall-hung vanity to avoid water damage from the floor (every old bathroom I've ever had the pleasure of living with had water damage to the bottom of the vanity!) and nice-looking taps. Here's what we ended up with:


The only thing I'd maybe do differently is the tiled lip around the bath edge. Water sits here and stains the grout easily. I don't know what else we should have done, but I'd probably have looked into it more if I'd known that would happen!


The wall-hung vanity has enough space to clean underneath easily and because it's off the floor, tricks you into thinking it's smaller than it looks. But it's a good size - the cupboard houses a hairdryer, straightener, clippers, soaps, toothpaste, extra toiletries. I'm also so pleased the handles are the built-in variety (Steve's choice - he done good!) because I am pretty sure everyone's knees and thighs would have been corked several on any handles sticking out! We deliberately stopped the tile at that height on this wall and the opposite wall - there was no reason to continue it to the ceiling like it is in the shower. It's also decision made by budget - it would have cost several hundred dollars more to tile the whole wall. I think I made it one row too high (the kids can't see themselves yet! But they'll grow!) but it's a minor, minor oops. We could choose where we wanted to place the basin and I deliberately chose to the right to allow for maximum benchspace and also I thought it might have felt a little cramped being so close to the door. I'm still planning to add a fence-paling frame around the mirror. One day!

I had these taps picked out before anything else in my bathroom. But I struggled to find a vanity I liked that had three holes - they all had one hole for a mixer tap. But I don't like mixer taps in the bathroom - especially in the bath/shower because the kids can bump them so easily and are highly likely to play with it because it's easy to do so! I also didn't want to do two different tap styles so I spoke to the plumber and we decided to mount them on the wall over an above-sink basin with no hole! I think it turned out for the best!


The drawers have more than enough room for my minimal amount of cosmetics, sunscreen, and other bits and bobs (I've come a long way from my days at Cosmopolitan magazine where I had boxes full of skincare and cosmetics from our beauty sales! And I hardly used any of it!)


Towel hooks were the only way we'd get enough hanging space for everyone, but even then I had to cut the number of hooks on the wall back to three instead of four (didn't want them hanging over the loo!) There are two more on the back of the door - Steve likes to hang his towel over the shower screen so we all still get a hook each! Soon, we'll have an ensuite and it'll be the kids bathroom, so plenty of space for just the four of them.


Just quietly, I also like the look of towels hanging on hooks rather than on towel rails. It's always nice when aesthetics are a by-product of practicality! I've had these flower towels (from Le Souk) for about six years and they're still in good nick. The grey Turkish towel is from a new local shop called Honey I'm Home.


My nice chunky built-in shelves. I'm so glad they're here - when we knocked through the other side of the house for the kitchen, we removed the only linen cupboard. With no built-in wardrobes and minimal kitchen space, this is the only other storage space in the house. So the top shelf houses sheets and pillowcases (extra doonas, pillows and blankets are in the cabin). Next is towel storage - all rolled up! Then there is a wire basket for toilet paper, bubble bath and nappy-rash creams, cotton wool and cleaning products (it's a Kmart basket I spraypainted black). Behind the basket is more toilet paper and tissue boxes; to the side is hand towels and face washers. Lastly, a laundry hamper slides into the space perfectly for dirty clothes (though it is SUCH a battle getting those kids to put their clothes into it!). Looking out into the kitchen - notice my half-done floor? This is how it's staying until we extend - the floor needs to be continued for a little bit in the dining room and I am NOT doing it now and then redoing it in a few months time! So all painting of ceilings/walls/floors and architraves in that area has ground to a halt!


The wire basket and laundry hamper are both from Kmart. Can't go wrong with black (well, the wire basket was silver, but I painted it!)

Inside the basket - baby/kids shampoo and bubble bath/oils, tub scrub, cotton wool and loo paper. We don't need or use a lot of stuff around here. I'll let you know how that changes when my girls become teenagers! Eek!
  
Towels always look better rolled up. Our beach towels go here too, but were (conveniently!) line-drying after swimming when I took these pics.
 

The nook! It's at the other end of the shower. I thought I'd use it for shampoo and conditioner storage, but they go on the windowsill and instead I usually display some greenery from our walks in a tiny bottle, a candle and usually my all-purpose mint spray. For these pics I switched it up with the first agapanthus to bloom in my garden!

That's about it! I'll write a little bathroom renovation guide in coming days for those who could do with some tricks and tips! I'm trying to work out the look of our ensuite bathroom in our loft, I can't imagine me veering too far from this kind of look. I'm a bit of a one-trick pony! But really, I can't see this going out of style quickly - there is nothing trendy here that will date. Plus there aren't too many patterns or colours or shapes or... stuff! No need to be tricky for the sake of it or for the sake of a DIY project. Pretty and practical has always been my mantra...x

Sources:
Taps: Mondella Resonance Chrome bath set, $75, Bunnings
Vanity: benchtop (Quantum Quartz in Alpine White), basin: (Siato above-counter basin) and vanirt (BTH Noah Wall WF-900 vanity), $620 for all three, Eagles Plumbing
Floor tiles: Bellazza floor tile in Mystic Granite, $10.45 for a box of 11, Bunnings
Wall tiles: Johnson Waringa White subway tile, 58c each, Bunnings
Showerhead: Estilo Round shower head, $29, Bunnings
Toilet roll holder: Caroma Cosmo Chrome toilet roll holder, $25, Bunnings


DIY cleaning products (that work better than anything I've bought)
cleaning .jpg

Sit down. I have to tell you something. All of a sudden, I enjoy cleaning. I also am starting to despise any kind of mess and am obsessed with decluttering. Living more simply seems to be where we're heading, but that's a whole other post. This one is still about that first bomb I dropped. I enjoy cleaning. WHO AM I? I am now clearly related to my clean-freak sister Kristie and equally neat Aunty Norma. Ok, I'm not that clean and tidy yet, but baby steps... Anyway, it started innocently enough - the dishes I'd leave in the sink overnight unwashed (YES. I did that. Eww) were nowhere to be seen. In fact, if the kitchen didn't sparkle before I went to bed, the next morning would just start bad and the whole day would go downhill from there. The three baskets of laundry that would overflow for a week and be tipped out onto the floor numerous times a day to find Zak's sock's pair or Immy's undies reduced to one basket that is almost always empty because I had this novel idea to put the washing away as soon as I grabbed it off the line. The shower is scrubbed every few days; the toilet daily, I vacuum several times a week and enjoy smacking the shizz out of my rug outside with Zak's plastic baseball bat (I hang it over the swing set and get so much enjoyment out of that - take out all frustration. I even let the kids at it. Layla is particularly good at whacking it). I've even ordered some old-fashioned wooden cleaning brushes to really get into the zone. In short. I enjoy cleaning. So much so, I'd look up DIY cleaning products on Pinterest while nursing Annika. I am SUCH a social butterfly...

Everyone knows the genius of baking soda, vinegar and lemon. I've tried the usual combinations before but always felt they lacked something (and not just a decent scent!) and for a while I even did the incredible great pairing of bleach and baking soda. Hardly good for anyone - and even then, the bath stains remained and the soap scum on the shower glass refused to budge. But now, I'm happy to have found some great recipes that are pretty easy to make and actually work. Not just work, but work better than anything I've bought at the store. Not even exaggerating. And because I made them myself, I could make the packing pretty too. So I dug out some old jars and repurposed an empty Murchison-Hume into the new mint all-purpose spray, which by the way, is genius.

So far I've made the all-purpose cleaner, a tub scrub, a laundry powder and a not-so-successful (but only because it wouldn't fit through the spray nozzle) stain remover. (If I master that one, I'll let you know.) My house and laundry are smelling so scrumptious lately, I had to share with you too. 

LAVENDER WASHING POWDER

*

Since moving out of home, the only washing powder Steve (and the kids) didn't have a reaction to was Omo Sensitive and the Eco Store powder. Everything else? Eczema breakouts and if I ever added any kind of softener? Rashes and allergic reactions. So to be perfectly honest, I was not expecting this to go anywhere, but they haven't had any reactions at all, which is brilliant because it smells so yummy, cleans so well and makes everything it washes feel good, clean and fresh. The original recipe I copied called for unscented soap, but I figured rather than adding essential oils, I could use the scented soap instead - that way, I can mix it up and try different "flavours" next time without having to spring for more essentials oils (I want to try peppermint next!)

You'll need:

1 bar Castile soap

(I used Dr Bronner's Pure Castile soap in Lavender)

1 cup Borax

(from the laundry aisle of the supermarket - Coles had it; Woollies didn't)

1 cup Washing Soda

(also from laundry aisle - not to be confused with baking soda. In my searches I've discovered you can make washing soda by baking the baking soda in a try in your oven. Baking it removes one of the carbonates, meaning it's no longer bi-carbonate soda, but carbonate soda, which is washing soda. Sheesh, I am such an expert on these things now).

How to:

1.

Grate your bar of soap into a bowl. The kids can - and will want to - help you with this. It is unavoidable if they are around. Just let them, a little grated skin is not going to harm your clothes! Ha!

2.

Add the Borax and Washing soda.

3.

The original recipe just required you to mix it together (you could add a few drops of essential oils if you used unscented soap, or if you wanted to pair to scents - I'd imagine vanilla and lavender would be a nice combination). After stirring it looked a bit too chunky for my liking. I only use cold water in my machine and wasn't sure the soap would dissolve so well. So i put a few batches of it through the Baby Bullet (a coffee grinder or good blender should also do the trick) and used the milling blade. It totally dissolved the grated soap and turned it into total powder. It looks like store bought stuff. 

4.

Place in a container of your choice. At first I put it back into an Omo container I had - it filled it about three quarters of the way. But then to pretty it up, I made good use of this jar I had in the back of my cupboard.

5.

Use one tablespoon of powder per load. I use two scoops of this wooden spoon.

PEPPERMINT ALL-PURPOSE SPRAY

**

I'm really shocked at how well this worked. Normally, trying to get rid of marks on the bath involved spraying with whatever bleach-ish spray I had and watching it streak the bath and not actually come away when I scrubbed it. This sprays on, scrubs off beautifully and leaves it looking brand new again (my bath is not even a year old yet so kinda new anyway but it has been grubby and this clears it right up). I use it on the counter, the loo, the tiles, the shower screen... It hasn't come out of the bathroom yet, but I might make a different scent for the kitchen...

You'll need:

A spray bottle

Liquid castile soap (I used Dr. Bronner's Liquid Castile Soap in Peppermint)

Water

Tea Tree Oil

How to:

Add two tablespoons of castile soap to each cup of water. Add a few drops of tea tree oil to the mix. Then shake and spray!

ORANGE TUB SCRUB

**

Ever wondered if ever there was a way to recycle your egg shells? Well stop! There is! Apparently, egg shells all ground up is basically calcium powder, which you can take as a supplement (I'd read up more on this before doing so though) or use to scrub your bathtub super-clean! Think of it as the cleaning regime's equivalent of an exfoliator. The finely ground shells are still gritty enough to scrub away at the surface, removing stains and grime. Plus it smells heavenly.

You'll need:

Egg shells - I used about a dozen and a half.

Baking soda (bi-carbonate soda). I used the same volume as whatever the eggshells made up.

20 drops of orange essential oil

How to:

1.

Collect your shells over a couple of weeks. I rinsed as I used them, then left in a container. When you're ready, place in a pot of boiling water on the stovetop and boil for around 10 to 15 minutes. Remove and lie on a tray and leave to fully dry - I left them in the sun, overnight and again in the sun for a few hours before crushing.

2.

In smallish batches, I gently broke them up a little more and placed in the baby bullet (a food processor or coffee grinder would also work). Using the milling blade, I blended until the shells were basically obliterated. It turned to powder. 

3.

Once all the shells were now calcium powder, I placed in a jar and added an equal part of baking soda (bi-carbonate soda). 

4.

Shake the jar until blended. Add your essential oil around five drops at a time, mix with the handle of a small spoon until all mixed up and no lumps!

5.

Use a small spoon or your fingers to sprinkle onto the surface you want to scrub. I sprinkle onto a wet sink or bath and scrub away, adding more water as I need to. 

And there you have it! Three easy to make cleaners that make your home smell sooooo good. And not a vinegar bottle in sight. (Though my next experiment is a vinegar-based floor wash with essential oils...) I'd love to hear your own stories of using homemade products - I was pretty skeptical a while back when the vinegar/bi-carb thing didn't work. But these versions - and the castile soap - seem to be the right mix. I'm keen to try more - disinfectant, dishwashing tablets.... What worked for you?! 

And in the interest of keeping things real, here is how my bathroom looked while shooting the pics. The sink kept casting a shadow on the bottles, so I raised them with a marble board! Books to the rescue again!

Turkish towel and wooden spoon, Honey I'm Home (local store); Marble tray from Aldi; diamond jar from Hot Dollar (I think); tiny brown vase is a baby panadol bottle; brown spray bottle, Muchison Hume.

* My adaptation of

this recipe

from

Step Into My Green World

** My adaptations of the recipes from

Little Green Notebook

The bathroom renovation part 1: moodboard, plans and before pics


The bathroom renovation has begun - yay! Its guts were ripped out on Thursday, frames were built and electrical work done on Monday, the plumbing "roughed in" (see? I know tech speak now) and walls put up on Tuesday. And today, the plasterer is sealing the walls and waterproofing begins tomorrow. Possibly - up until yesterday afternoon we had no tiler! Ahh the fun and games of renovating. We've been using the bathroom in our cabin, which aside from flooding during heavy rain, has been incredibly useful during this period - no cold hose showers in the backyard thank goodness. However, the hot water system in there is on its last legs so to stop it overworking AND overcompensating for is hopelessness by using extra power, we've had to turn the water and power on an hour or so before we want to shower, which means family shower time in the evening - because no one is keen to get up an hour earlier than necessary to have it warm for a morning wash. We grab our PJs and towels head into the backyard cabin for our shower. It's a little like camping, though I just imagine we live in a mansion and I need to walk to the other wing as my ensuite is being upgraded. Or something.... Funnily enough, the shower in that bathroom - teeny tiny space-wise - has the best showerhead and pressure. Hopefully our new rain-style showerhead will top that one! 

So up until last week, our bathroom looked like this:
 Just 175cm by 290(ish) - very small. It just fit a shower, bath and vanity. The toilet is in the laundry off the kitchen and seeing as we will be ripping that whole area out soon, we need to add a loo to our bathroom before that happens! There was a small pantry set into the bathroom (the door opened into the kitchen) which I decide would be better served as tall narrow built-in shelving in the bathroom. Because honestly, what a stupid sized pantry this is - it's about 15cm deep! 

While it's certainly not the worst bathroom I've ever had the pleasure of living with (this one was worse), it was still gross - the tiles were falling off in the shower, the water and vanity rotting, the bath was a big stain fest and there were mismatched tiles and mould everywhere. We wanted to make it look nicer and function better. To give you an idea of changes to the space, here is an incredibly professional-looking (!) floorplan of the before and after.
 
Unfortunately, there is no room for a luxe walk-in shower and freestanding bath in this house. Instead, we've rejigged the layout to make a shower and bath combo and leave room for a toilet and some open shelves. The vanity will be on the wall with an above-counter sink and the shower screen will swivel like our last one for easier access to the bath when washing little people. Instead of a towel rail, I've gone for hooks - this way we can actually have more hanging space for the SIX people who will be using it, unlike towel rails which require towels to be spread out and therefore less of them. Three to four will be on the wall and the others on the back of the door. The only thing that is staying is the door and the window - we were planning on replacing the window but it was an unecessary expense really - there is nothing wrong with this one (aside from its boringness) so to dress it up a little, we're tiling around into it so it'll be like a windowed alcove/shelf, which also addresses any fears I had with the window being SO close to the water.

So how will it look? We-ll, probably very white. We've got some dark grey floor tiles, white subway for the walls and a white vanity, benchtop and basin. I'm a little worried it'll look too white and slick, so I plan to frame the mirror with some timber and whitewash it similar to our floors. Hopefully a bit of timber will add some warmth and texture. Am also hoping the open shelves (floor to ceiling) will add some texture as they'll be stacked with rolled-up towels and some baskets of toiletries. Just need to find the right baskets!

I learnt a few lessons from our last bathroom reno and the previous ones I've lived with while renting.
- Pointy taps suck and can hurt your hands.
- Kids are great at dropping things that break into the sink by bumping it while on the vanity (and our vanity is never clear of stuff) so a raised basin not only looks nice, is handy too as nothing can fall in accidentally (on purpose is a whole other story though).
- Little gaps between fittings and walls are impossible to clean - hopefully a wall-mounted vanity will help this.
- White tiles on the floor just don't work as there is no win with the grout - if you use dark grout it looks like white grout that is dirty. If you use white grout, it always looks like dirty white grout!

So taking those things into account, here are some of our fittings this time around...


1. Mondella Resonance Chrome bath set, $75, Bunnings I admit I totally had these taps picked out before anything else in my bathroom. I just like the way that kind of stand out on the wall! But my dilemma was that all the vanities I looked at had one holes - for a mixer. I didn't want a mixer tap in the shower/bath because the kids can bump them easily and are more inclined to play with it because it's easy (my kids bump a lot). But I didn't want two different styles in the bathroom either. So I finally decided to mount the taps on the wall over an above-sink basin.

2. BTH Noah Wall WF-900 vanity, $620, Eagles Plumbing I looked everywhere for a vanity I liked - online, in stores, in showrooms... Eventually I found it and we had a few options - finger pulls or handles. I let Steve chose (because I honestly couldn't. And also, I need to let him have SOME say) and he chose the finger pulls. It looks a little like this but we have a basin that sits on top and the drawers are on the left. The basin will sit to the right so it's not so close to the door and gives us a little more benchspace. I also liked the fact the price included the vanity, benchtop AND basin.

3. Quantum Quartz benchtop in Alpine White (part of vanity price, above) Simple and white - I thought about something with grey flecks but the samples were so small and I just wanted to order it so it would arrive on time, so white it was.

4. Bellazza floor tile in Mystic Granite, $10.45 for a box of 11, Bunnings I used the same tile in a slightly darker colour for the floor of our laundry in our last house. I wanted something that would match the rest of the tones throughout the house and grey was it. It also looks good next to the whitewash of the floor (see first pic in post) and should provide a nice contrast to the all-white. When shopping for floor tiles take a bottle of water with you (or take a tile to a bathroom in store like I did) and splash some water on it and see just how slippery it is. Most tiles are going to be slightly slippery, but there is wet-bathroom-floor slippery and there is banana-peel-in-cartoons-slippery which is what you definitely don't want. The house we rented last had WALL TILES on the floor and was in the latter category. Lost count of the times one of my family members hit the deck at that house...

5. Siato above-counter basin (part of vanity price, above) I debated: round bowl vs square bowl. This rectangle one with rounded edges ended up being the best of both worlds! It's quite shallow but is large and pretty. The first one arrived on a courier in a box that looked like elephants had played soccer with it. Not surprisingly, the basin was all cracked. Next day it was replaced, no problems and I bought a pop-up plug to go with it. I'm usually don't give too much attention to things like plugs, but this is cool. For a plug. And can't get lost - bonus points.

6. Caroma Cosmo Chrome toilet roll holder, $25, Bunnings Recently Steve and I went away for a few days to celebrate our 10th wedding anniversary (10 years! high five!) - one of the places we stayed at had a toilet roll holder that was vertical. This - and the rain showerhead - was the highlight of the trip. Not quite, but it became a requirement that when I was shopping for bathroom items, could I please find a vertical toilet roll holder. So I found this one - with a similar round shape to the taps - that can be installed so it stands upright and the toilet paper roll WON'T FALL OFF! It will also mean it is harder for a certain little two-year-old girl to not unroll an entire roll of toilet paper onto the floor. Hopefully.

7. Johnson Waringa White subway tile, 58c each, Bunnings I think since I installed subway tile in our last kitchen, I was always going to use subway tile in our next bathroom. And that's what I've got! The tile will go to the ceiling in the bath area and around the window and small shelf alcove. There is also a little lip around the bath that will be tiled and then the rest of the room will have it as high as the vanity taps. This was a cost thing more than anything, but I think it will work well with the mirror and towel hooks sitting on the wall, not tiles.

8. Estilo Round shower head, $29, Bunnings The showerhead I really wanted didn't have any rubber bits on the holes and was about 50 times more expensive. We'll save that one for our ensuite. This should do the trick here - it's nice and big and will be installed slightly higher than normal as Steve is 6ft3.

So that's where we're at. It's all coming together and should be ready in a week or so! YIPPEEE!

{Images and incredibly awesome floorplans by Belinda Graham for The Happy Home; product images in the collage linked to in their description}


before + after: bathroom
bathroomafter7

When we inspected our house I thought my husband was crazy for actually considering buying it. It really was hideous. But we couldn’t get past the fact we were 100 metres to the water (we have waterviews from our… driveway!), it was big and had potential. Plus, we were after a “project”. And we certainly got that! The bathroom confused me (click here to see floorplan). There was a huge shower and a vanity and that was it. The toilet was on the other side of the house – WHY? For a largeish house, it had a tiny bathroom. And also, they had tiled every surface in the bathroom, including the back door. You felt like you were in an asylum and couldn’t close the door all the way because there was no way you’d get it open again because it was so incredibly heavy it dragged on the floor. For some insane reason we put up with this for a few years. I couldn’t handle looking at brown and white tiles with sunflowers on them, so I painted over them but that didn’t achieve much. When Zak came along we were determined to get it done – I didn’t want him growing up without a proper bath, so we got started. We asked our local hardware for recommendations for a builder, got a couple of quotes and ended up going with a carpenter who we’ve employed to do every job since around here. He was not only the best priced, but the main selling point was the fact he actually listened to what we wanted, really spent time working out measurements to make sure what we wanted to do would fit (like if there was enough space behind the door for a toilet if it was in the middle – one guy just said “nope, no chance”) and made suggestions of his own. This is someone you want to work with.
3259060575_d365a5b3bb 
BEFORE: This linen cupboard was ripped out to allow for more space.
bathroomafter1 
AFTER: Despite being only 180cm by 210cm, we managed to fit a bath/shower combo in, vanity and toilet in (behind the door) without it feeling too cramped.

And so, our quote came in at around $8000 – this included everything; a new wall structure, new window and door, the fittings, appliances, plumbing, tiling, plastering and electrical work. Obviously the price would fluctuate depending on what fittings I bought – he allowed for an average price. In the end, I think we only spend a few hundred more and the only problem was the tiler who just decided he didn’t want to do it anymore and quit after waterproofing for some unknown reason. God he was the grumpiest man I’ve ever met. And I honestly think he had a baby phobia and that was his reason for quitting – an odd thing to say, but you should have seen the look he gave Zak when he saw him….

3259060667_bb71555767 
BEFORE: Ugh vanity that was rotting and had one big open space taken up by the pipes. The mirror was to the side – not handy at all.

bathroomafter2 
AFTER: As much as I love all white, I wanted some natural elements and a little darkness in the bathroom too. I decided on a dark brown floor tile, white walls and a chocolate brown vanity with white top. To break up the mono, I found this simple stone mosaic from Amber Tiles on special for just $10 a sheet for between the vanity and mirror. I like that it adds a little something to a very simple room. The vanity has shelves and plenty of space, and one of those clever drawers that is divided around the pipes when you pull it out. Oh and it never looks like this normally – there is crap all over it. The only downside is there isn’t much benchspace…

bathroomafter4

Anyway, soon enough we were done and able to have a bath. An added bonus  is we can watch TV from the bath if we really want to. When we moved here I left my beautiful claw-foot bath behind in our old house and had nothing. I needed something deep again, so chose the deepest, longest simple bath I could to fit the space. This was from Bunnings – as was the vanity, toilet and wall tiles. No space for pretty free-standing baths here. Maybe next time…

3259892226_08e3cb59c1 
BEFORE: This shower was as hideous as everything else in the room. It had tiles missing, cracks in others, the door would come off its runners… nightmare. I was NOT sad to see it go.

bathroomafter5 
AFTER: If we wanted a bath, the shower had to go on top of it. Not ideal, but much better than the alternative: no bath. I debated installing those fixed glass panes but then discovered one on a swivel which is genius as you can open it up to reach the taps easily and wash the babies. And also, it’s a lot longer too, so the water spray isn’t as much as it is with those panels. 

bathroomafter3

As with all things I’ve done around here, there are things I’d do differently if I did it again. But it’s functional and nice enough and 10000 times better than it was. And it didn’t cost an arm, leg or my first-born child (who, I might add, is thisclose to being given away for nothing in return at the moment. grr)

A few other details:
White flower towels (my fave!), Le Souk – just noticed these are on special for the month of January
Chevron bathmat, Adairs
Towel rack, Howards Storage World
Glass panel, Brisbane Water Glass
Apologies for grainy, wonky pics. It’s really hard to take a good picture in there – so small and I can’t quite blend into a wall as much as I’d sometimes like to!
Belinda x
Twitter Facebook Flickr