Posts tagged popular
Beautifying and highlighting imperfections in the home
gold leaf kintsugi 1.jpg

If you've read my waffle for the past 9 and a half years (seriously, that is how long I've been blogging. That is scary.) you'll know how I'm not big on perfection. Perfect spaces, perfect people, perfect things - they are not real to me. Add a little wonkiness to a house, some mess to the waves of someone's hair or a few tell-tale signs of age on items and they become more interesting to me. And usually more beautiful. Recently I read about Kintsugi - a Japanese art form that sees damaged items repaired with gold (or silver). Rather than throw away broken crockery or smooth over cracks in rendered walls, the imperfections are highlighted with gold leaf and sealed with lacquer, creating an interesting feature of a home or allowing a favourite plate to continue dishing out your meals - with a little bling on the side. The method humanises things - giving them some attention, patching them up and letting them continue on their merry way rather than just giving up on them at the first sign of a breakdown. It's giving even the most ho-hum items a history, a story and a chance to shine. It's such a sweet sentiment in this throwaway world, and because I love gold leaf - and maybe because Marie Kondo and her whole "socks have feelings too" craziness has rubbed off on me more than I thought - I had to try it out on some damaged things I had around the house. 

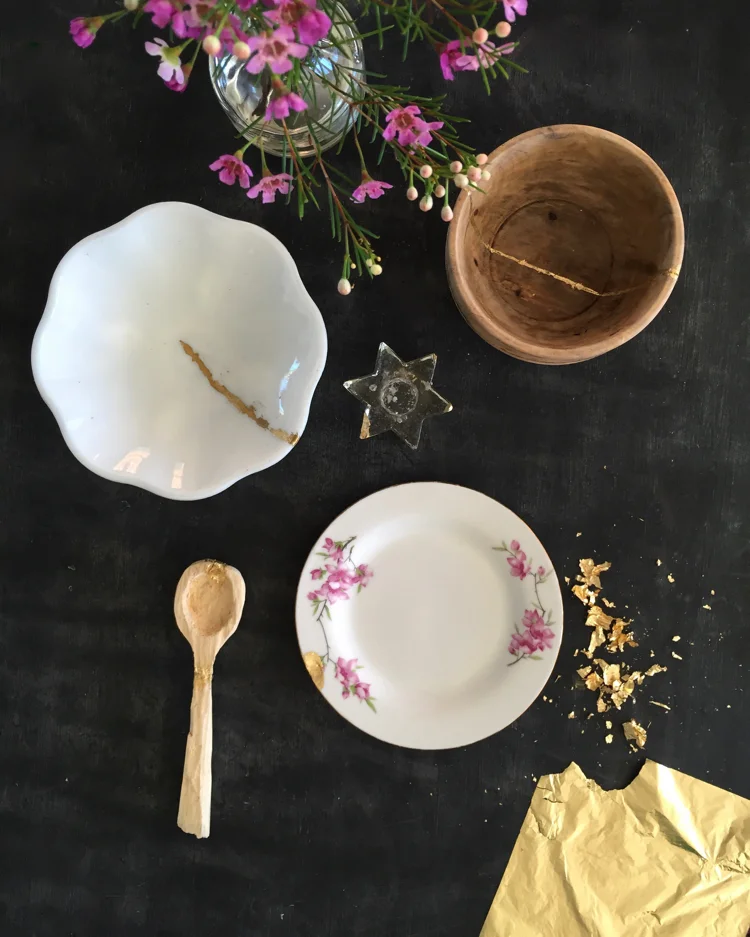
First up: the small wooden bowl Steve found in the water on one of our walks a few years ago. It was green and gooey on one side and stunk like goodness knows what, but we thought it might clean up ok. So we soaked it and scrubbed it and it did clean up beautifully - but it was cracked in several places. So in went the size, and in went the gold leaf. It's certainly not the neatest follow-the-line I've ever done, but that's the whole point about this method: imperfections can be beautiful, and the wonkiness just gives it even more character. I love the glimmer on the rustic wood - I could never tire of that combo! 

Next, I hit up the kitchen cabinet where my Nana's dishes were. The pink floral plate was part of a few sets my grandparents bought many decades ago for my mum's wedding. I had a full set once - complete with tea cups and saucers - and accidentally threw the wrong box on the charity pile (and managed to keep a whole bunch of unwanted crap on the keep pile instead! Eek!) so I only have a few pieces left. I knew there was a big chip out of one of the side plates, so a few minutes later that chip looked a whole lot chipper (sorry) with its new gold coat - especially since the plate is gold-rimmed. I also blinged up a few op-shop pieces - several chips in a little star candlestick and the tiniest crack in a milk-glass bowl.

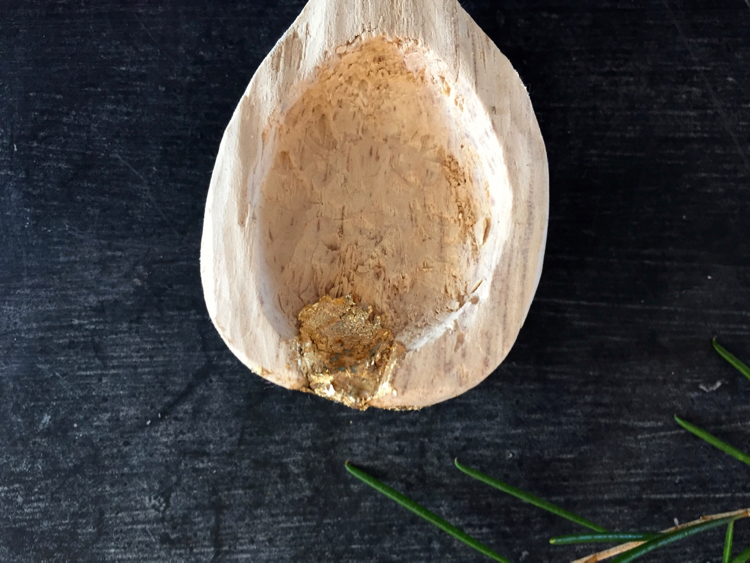
I actually thought that was all I had when a few nights later I decided to try my hand at making a wooden spoon out of a piece of driftwood and a lino-carving tool. Obviously, neither of these things are going to work as well as, say, proper wood and a real wood-carving knife. But I wanted to see what it was like to do before I invested in a proper knife and so had a play. It was strangely addictive - I drew a shape, cut and carved with the rounded lino tool (and yes, cut myself several times) and in an hour or so had a pretty cool shaped spoon. Except a knot was right where the rounded end of the spoon was and soon became a hole! And then, while wondering when I should quit it on the handle -  SNAP! I wondered too long so the whole thing broke. I originally threw it on the compost, but decided to keep my very first attempt at spoon carving because I really enjoyed doing it - even if it was never going to be able to be used as a spoon, was not even close to smooth and had a hole in a crucial part of it. Steve glued it together for me and I gave it the gold treatment. Now, rather than just being a weird unfinished, holey, broken wooden spoon, it's got a story, a history and a little bit of prettiness about it. I love that!

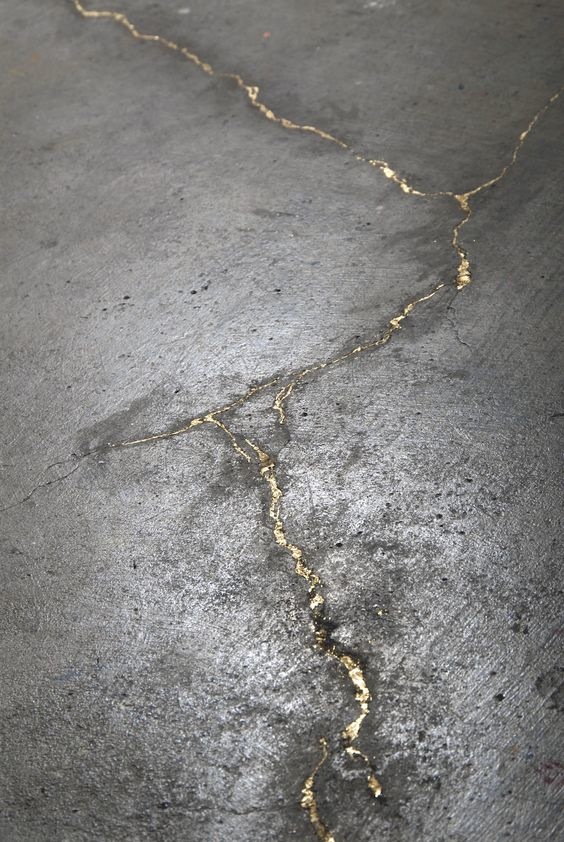
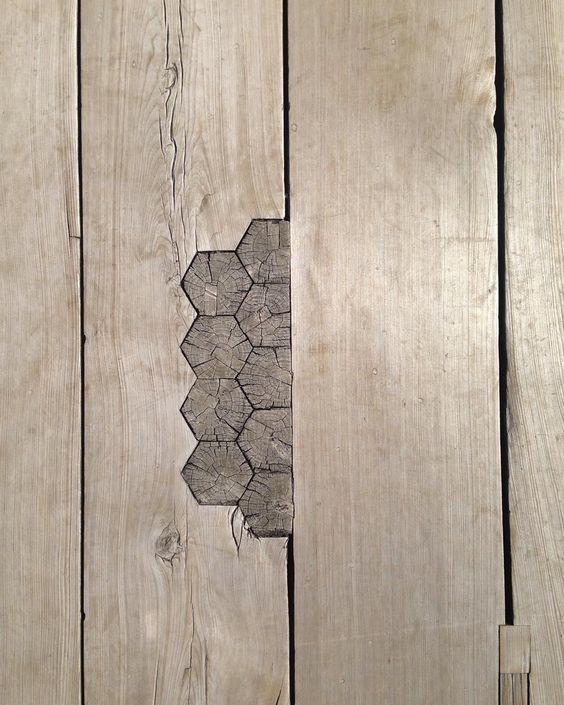
It's kind of an addictive idea - I can't help look around the house and see other imperfections I'd love to highlight somehow: holes in the floorboards from old knots, cracks in the concrete driveway... I'm completely in love with both of these ideas, above, from the

original article

I read about kintsugi. The art form is not just about gold leaf, but also patching things with similar materials but in different shapes, colours or patterns - such as adding the odd patterned tile in a bathroom wall of solid colour tiles. It really is giving the less-than-perfect aspects of a home some time in the spotlight to shine. And who doesn't like that occasionally?

{Top 3 images by Belinda Graham for The Happy Home. Concrete and gold leaf image is an part of an installation called Seam by Catherine Bertolt via

Workplace Gallery

; Patchwork timber floorboard via

Material Valley

}

My home style over the years
black bedroom.jpg

After

last week's post

about Instagram messing with my mind and making me question my taste in things, I wondered how much my style had changed over the years. So I went through the archives of my blog (and when I say archives, I mean the archives via

Wayback Machine

- this poor blog has been majorly hacked a couple of times over the years, meaning a whole bunch of content has yet to be posted to this site; I could win awards in procrastinating). Anyway. Going through the archives I realised my style hasn't changed too much at all - maybe refined a little, but mostly, the basis is the same: white, black, grey, hits of natural timber and a shot of surprise. For colours I still like them muted and with a touch of grey.

I also spent a silly amount of time looking through my Pinterest boards - back to the start when I first starting pinning images I loved. Aside from the odd WTF picture (usually after looking at it for a little while wondering if it was an accident, I noticed there was some small part of the image that spoke to me, not the entire thing), I realised again, it was pretty consistent. Looking through my past, it's clear I've always had these relatively clean, simple spaces. Even when the mess was insane covering every surface and you're ankle-deep in tiny toy cars or dolls, the spaces were still relatively simple in terms of furniture, decor and colour. I've always said I was afraid of colour and would joke that I'm boring in my decor. I wondered when the urge to throw a red cushion on my couch would hit. Or to buy bright art or paint a wall something other than black, white or grey. It never has! So boring or not, this is obviously who I am and I guess there is nothing wrong with it. It's taken me a while to accept that. I thought I was waiting to grow up and find my style. It turns out it's the same style I've always had and most likely always will. I realised, though, while the rooms are pretty simple and standard, I've always tried to incorporate some kind of statement feature - murals in a kids room, driftwood hanger, cut-out recessed shelves, stencilled window, black wall, fairy lights in a branch... Just one thing to make it look a little more unique - and it's not often something bought, but something made - something just for you that not every single person on Instagram has bought from Typo or Kmart or the wall decal store. Creating something yourself - or directing someone else to do it for you! - is the best way to inject that bit of personality into your home. After all, a house is a home when it reflects those who live there. 

I can't imagine me straying too far from this formula for our upcoming extension and renovation - in my mind the house itself is all blindingly white walls with black accents on door hardware, the fireplace and fans, stair rails and balcony and the odd piece of furniture. The floors will be natural timber (my whitewashed floors were nice, but annoying to upkeep so they're going), there'll be a few statement pieces of furniture (hopefully!), a bunch of greenery with houseplants, simple and stylish rugs, a few fun kids elements and pieces and features that we love and that bring us joy (see

previous post!

). 

It's all going to be simple and clean - the calming backdrop for our chaotic lives, the perfect blank canvas for our colourful crafts and imaginative play, the ideal space for our family to grow, spend time with each other and have our own spaces for that all-important alone time. The kids will get a say in how their rooms will look and Steve will have his own library space to play with, leaving me in charge of tying it all together. I can't wait. 

{All images of my previous homes. Pictures by Belinda Graham for The Happy Home}

DIY cleaning products (that work better than anything I've bought)
cleaning .jpg

Sit down. I have to tell you something. All of a sudden, I enjoy cleaning. I also am starting to despise any kind of mess and am obsessed with decluttering. Living more simply seems to be where we're heading, but that's a whole other post. This one is still about that first bomb I dropped. I enjoy cleaning. WHO AM I? I am now clearly related to my clean-freak sister Kristie and equally neat Aunty Norma. Ok, I'm not that clean and tidy yet, but baby steps... Anyway, it started innocently enough - the dishes I'd leave in the sink overnight unwashed (YES. I did that. Eww) were nowhere to be seen. In fact, if the kitchen didn't sparkle before I went to bed, the next morning would just start bad and the whole day would go downhill from there. The three baskets of laundry that would overflow for a week and be tipped out onto the floor numerous times a day to find Zak's sock's pair or Immy's undies reduced to one basket that is almost always empty because I had this novel idea to put the washing away as soon as I grabbed it off the line. The shower is scrubbed every few days; the toilet daily, I vacuum several times a week and enjoy smacking the shizz out of my rug outside with Zak's plastic baseball bat (I hang it over the swing set and get so much enjoyment out of that - take out all frustration. I even let the kids at it. Layla is particularly good at whacking it). I've even ordered some old-fashioned wooden cleaning brushes to really get into the zone. In short. I enjoy cleaning. So much so, I'd look up DIY cleaning products on Pinterest while nursing Annika. I am SUCH a social butterfly...

Everyone knows the genius of baking soda, vinegar and lemon. I've tried the usual combinations before but always felt they lacked something (and not just a decent scent!) and for a while I even did the incredible great pairing of bleach and baking soda. Hardly good for anyone - and even then, the bath stains remained and the soap scum on the shower glass refused to budge. But now, I'm happy to have found some great recipes that are pretty easy to make and actually work. Not just work, but work better than anything I've bought at the store. Not even exaggerating. And because I made them myself, I could make the packing pretty too. So I dug out some old jars and repurposed an empty Murchison-Hume into the new mint all-purpose spray, which by the way, is genius.

So far I've made the all-purpose cleaner, a tub scrub, a laundry powder and a not-so-successful (but only because it wouldn't fit through the spray nozzle) stain remover. (If I master that one, I'll let you know.) My house and laundry are smelling so scrumptious lately, I had to share with you too. 

LAVENDER WASHING POWDER

*

Since moving out of home, the only washing powder Steve (and the kids) didn't have a reaction to was Omo Sensitive and the Eco Store powder. Everything else? Eczema breakouts and if I ever added any kind of softener? Rashes and allergic reactions. So to be perfectly honest, I was not expecting this to go anywhere, but they haven't had any reactions at all, which is brilliant because it smells so yummy, cleans so well and makes everything it washes feel good, clean and fresh. The original recipe I copied called for unscented soap, but I figured rather than adding essential oils, I could use the scented soap instead - that way, I can mix it up and try different "flavours" next time without having to spring for more essentials oils (I want to try peppermint next!)

You'll need:

1 bar Castile soap

(I used Dr Bronner's Pure Castile soap in Lavender)

1 cup Borax

(from the laundry aisle of the supermarket - Coles had it; Woollies didn't)

1 cup Washing Soda

(also from laundry aisle - not to be confused with baking soda. In my searches I've discovered you can make washing soda by baking the baking soda in a try in your oven. Baking it removes one of the carbonates, meaning it's no longer bi-carbonate soda, but carbonate soda, which is washing soda. Sheesh, I am such an expert on these things now).

How to:

1.

Grate your bar of soap into a bowl. The kids can - and will want to - help you with this. It is unavoidable if they are around. Just let them, a little grated skin is not going to harm your clothes! Ha!

2.

Add the Borax and Washing soda.

3.

The original recipe just required you to mix it together (you could add a few drops of essential oils if you used unscented soap, or if you wanted to pair to scents - I'd imagine vanilla and lavender would be a nice combination). After stirring it looked a bit too chunky for my liking. I only use cold water in my machine and wasn't sure the soap would dissolve so well. So i put a few batches of it through the Baby Bullet (a coffee grinder or good blender should also do the trick) and used the milling blade. It totally dissolved the grated soap and turned it into total powder. It looks like store bought stuff. 

4.

Place in a container of your choice. At first I put it back into an Omo container I had - it filled it about three quarters of the way. But then to pretty it up, I made good use of this jar I had in the back of my cupboard.

5.

Use one tablespoon of powder per load. I use two scoops of this wooden spoon.

PEPPERMINT ALL-PURPOSE SPRAY

**

I'm really shocked at how well this worked. Normally, trying to get rid of marks on the bath involved spraying with whatever bleach-ish spray I had and watching it streak the bath and not actually come away when I scrubbed it. This sprays on, scrubs off beautifully and leaves it looking brand new again (my bath is not even a year old yet so kinda new anyway but it has been grubby and this clears it right up). I use it on the counter, the loo, the tiles, the shower screen... It hasn't come out of the bathroom yet, but I might make a different scent for the kitchen...

You'll need:

A spray bottle

Liquid castile soap (I used Dr. Bronner's Liquid Castile Soap in Peppermint)

Water

Tea Tree Oil

How to:

Add two tablespoons of castile soap to each cup of water. Add a few drops of tea tree oil to the mix. Then shake and spray!

ORANGE TUB SCRUB

**

Ever wondered if ever there was a way to recycle your egg shells? Well stop! There is! Apparently, egg shells all ground up is basically calcium powder, which you can take as a supplement (I'd read up more on this before doing so though) or use to scrub your bathtub super-clean! Think of it as the cleaning regime's equivalent of an exfoliator. The finely ground shells are still gritty enough to scrub away at the surface, removing stains and grime. Plus it smells heavenly.

You'll need:

Egg shells - I used about a dozen and a half.

Baking soda (bi-carbonate soda). I used the same volume as whatever the eggshells made up.

20 drops of orange essential oil

How to:

1.

Collect your shells over a couple of weeks. I rinsed as I used them, then left in a container. When you're ready, place in a pot of boiling water on the stovetop and boil for around 10 to 15 minutes. Remove and lie on a tray and leave to fully dry - I left them in the sun, overnight and again in the sun for a few hours before crushing.

2.

In smallish batches, I gently broke them up a little more and placed in the baby bullet (a food processor or coffee grinder would also work). Using the milling blade, I blended until the shells were basically obliterated. It turned to powder. 

3.

Once all the shells were now calcium powder, I placed in a jar and added an equal part of baking soda (bi-carbonate soda). 

4.

Shake the jar until blended. Add your essential oil around five drops at a time, mix with the handle of a small spoon until all mixed up and no lumps!

5.

Use a small spoon or your fingers to sprinkle onto the surface you want to scrub. I sprinkle onto a wet sink or bath and scrub away, adding more water as I need to. 

And there you have it! Three easy to make cleaners that make your home smell sooooo good. And not a vinegar bottle in sight. (Though my next experiment is a vinegar-based floor wash with essential oils...) I'd love to hear your own stories of using homemade products - I was pretty skeptical a while back when the vinegar/bi-carb thing didn't work. But these versions - and the castile soap - seem to be the right mix. I'm keen to try more - disinfectant, dishwashing tablets.... What worked for you?! 

And in the interest of keeping things real, here is how my bathroom looked while shooting the pics. The sink kept casting a shadow on the bottles, so I raised them with a marble board! Books to the rescue again!

Turkish towel and wooden spoon, Honey I'm Home (local store); Marble tray from Aldi; diamond jar from Hot Dollar (I think); tiny brown vase is a baby panadol bottle; brown spray bottle, Muchison Hume.

* My adaptation of

this recipe

from

Step Into My Green World

** My adaptations of the recipes from

Little Green Notebook