Book Week costume: Lost and Found boy
lost and found cover.jpg

Our household adores Oliver Jeffers. He can do no wrong! His illustrations and stories are so sweet and heartwarming. And those characters he comes up with? Adorable! They're the perfect little characters to bring to life. I wanted to recreate the cover of

Lost and Found

as soon as I saw it. I got close one day when Annika sat in an upside down umbrella at the cricket but there was a cute penguin missing and she wasn't wearing the right gear so I figured a future Book Week would be the right time. And here we are! I asked Immy if she was keen to wear it in the parade and she was so excited and wanted everything perfect - down to the tiniest detail like a little brown suitcase and a tag hanging from the umbrella handle. No pressure, Immy... Well, it may not be perfect but it turned out pretty cute anyway! I don't normally like buying things with the sole purpose of destroying them but when I realised I had already thrown out my old umbrella that didn't close, I searched for a cheap one - this was a whole $4 so I had no problem cutting a hole in it. Especially after one of the inside arms broke within two minutes of Annika stealing it and walking around the house with it. That's what $4 gets you I guess! Painting umbrella fabric wasn't very successful so I bought some yellow and orange cardboard and cut them up. At first I used double-sided tape to stick them on, but after they came away it was the hot glue gun to the rescue yet again!

Lost and Found

umbrella costume tutorial

You'll need...

A small-to-medium-sized umbrella you're happy to ruin. A hooked handle is even better

2 sheets of orange cardboard

2 sheets of yellow cardboard

Black paper or cardboard (optional)

Hot glue gun

Brown kraft paper 

String

Scissors

Step 1:

Measure up the cardboard against the umbrella - you want it in-between the metal parts. Cut to size and hot glue gun into place.

Step 2:

Overlap at the centre of the umbrella and continue all around alternating the colours.

Step 3:

Cut a circle from the black card or paper and a smaller circle from the middle and slide it over the point of the umbrella and glue in place to 

hide all the joins of the cardboard.

Step 4:

Turn the umbrella over and see where you want the legs to go. I used liquid chalk to draw a quick outline and then just cut through the plastic and into the cardboard. Cut the two pieces together for the neatest line. 

Step 5:

Reinforce the cardboard with some more glue around the edges of the hole.

Add a little kraft paper tag from the handle, insert child and have them hold the umbrella and hug a penguin. We made our penguin from paper mache but if you're not that keen (I realise I'd be in the minority here!)  maybe you can make a child's day/week/month/year by buying them a penguin Beanie Boo (dear god WHAT IS WITH THOSE THINGS? Why do they love them so much?!) 

And also... We didn't have a red and white striped shirt BUT we did have a very stained plain white one so I grabbed some red poster paint and got painting. I stuck good old plain sticky tape into stripes on the top and painted in-between - it made the perfect stencil by peeling off easily and didn't bleed! Steve knitted the hat in the right colours (not that you can really see the orange band!). And a tiny suitcase was also made with a plain brown box, some kraft paper to cover up the stamps, and a little leather strap glued on the top as the handle. And that's it! Imogen is so excited and can't wait for the parade (though I'm sure I'll be carrying home an open, ruined, yellow and orange umbrella as soon as the parade is over!) 

Luckily Zak just wants to be Klaus from

A Series of Unfortunate Events

which pretty much involves a pair of glasses, a collared shirt and jumper and maybe a book or two?!? At least it's not a

Clone Trooper

this year! 

I'm thinking this one might be my favourite of the three I created this year (I also made the blue crayon from 

The Day The Crayons Quit

 and The Queen of Hearts from 

Alice in Wonderland

). Which do you like the most?

Book Week costume: The Queen of Hearts
queen of hearts.jpg

I know what you're thinking: "Wow! No one has EVER - in the history of book parades - gone dressed as an

Alice In Wonderland

character!" But I chose the Queen of Hearts for a few reasons - one of them because I wanted to finally use the fantastic IKEA Lattjo Queen crinoline and skirt I bought ages ago (which is no longer available by the looks of it). And secondly, because it IS a popular character and I think it's pretty darn easy to make it look fantastic without having to sew anything or buy too much. All I bought for this outfit was a packet of cards and two plastic tablecloths for the skirt from Kmart. A grand total of $7 was spent as I had the rest of the stuff at home already. I realise part of what makes this look good is the puffiness from underneath it - a tutu or frilly skirt should do the trick and if you have a girl, chances are you have one of those lying around your house already! The collar I discovered on Pinterest in various incarnations and is so simple but so effective! Bravo to the clever person who came up with the original idea! 

So what does one need for the Queen of Hearts? A skirt, a crown, some heart lips, rosy cheeks, heart-shaped staff and a very fabulous card collar. And Layla's royal pain-in-the-butt princess attitude goes a long way too...

Queen of hearts plastic tablecloth skirt tutorial

You'll need...

A white round plastic tablecloth, $2 from Kmart or pretty much any bargain/party shop (For memory the size was 2.1m)

A red rectangle plastic tablecloth, $2 from Kmart (or other budget/party shop)

Thick elastic

A hot glue gun

A sticky velcro hook-and-eye dot

Scissors

Coloured paper in black, red and gold (I just spray painted a sheet of paper with gold spray paint before cutting it up into hearts)

A large safety pin

A tutu, frilly skirt, net or hoop for underneath

Step 1:

Unfold the round tablecloth until it's folded into a quarter, as above. In the pointy corner which is the centre of the tablecloth (the bottom right in this picture), cut across it to create a hole in the middle. 

Step 2:

Unfold so it looks a little like a white plastic donut! You might need to make adjustments here to make it bigger if you were cautious with your original cut - you'll want to be able to step into the hole and pull it up around your waist with plenty of room to spare. 

Step 3:

Carefully fold back the edge of the hole so it forms a seam big enough to easily thread the elastic through afterwards. Use your hot glue gun to gently glue the seam in place. Don't leave it on the plastic too long - it will burn a hole in it! But the glue itself does a pretty good job. Continue all the way around back to the beginning but leave a bit of a gap to allow the elastic through.

Step 4:

Attach a safety pin to the end of a piece of elastic and thread through the seam gently. Work out what will fit comfortably around your child before tying it off and cutting. The skirt will gather slightly. Pop it on your child - they'll be your mannequin for the next few steps.

Step 5:

Unfold the red tablecloth and lay it out on the floor. Cut off a strip longways - about 40cm thick and put aside. This will be your ribbon to hide all fake-sewing sins!

Step 6:

Wrap the larger piece of the tablecloth around your child, covering the top of the white skirt. Pinch at the meeting place and have your child hold.

Step 7: 

Stick on the sticky velcro dot to secure.

Step 8:

Cut from the velcro dot down along each side on a diagonal, curving at the bottom.

Step 9: 

Fold the skinnier piece of the red tablecloth you had set aside into a neat strip and wrap around the waist, covering the top of both skirts. Tie into an oversized bow at the back.

Step 10:

Cut out paper hearts in various sizes and colours and stick in place on the front of the white skirt that is visible. 

♥♣♦♠♥♣♦♠♥♣♦♠♥♣♦♠♥♣♦♠♥♣♦♠♥♣♦♠♥♣♦♠

Queen of Hearts card collar tutorial

I'm sure this doesn't actually need a tutorial as it's pretty easy, but here is what I did anyway! 

You'll need...

A packet of playing cards, $3 from Kmart

A hot glue gun

White ribbon

Step 1:

Fan out several cards until you have a rainbow! I wanted more than just the number showing so placed them individually in place to create this shape. Once you're happy with the placement, begin gluing them together.

Step 2:

Glue gun the ribbon over the bottom edge of the cards on the front. It's not pretty but it won't really be seen anyway (and is really hard to do neatly!)

Step 3:

Do the back as well for extra strength and neatness (and also to avoid potential paper cuts!) Glue the very edges of the ribbons together where they first meet. Tie around the neck gently - it will naturally sit upright as you tighten and tie off into a bow.

♥♣♦♠♥♣♦♠♥♣♦♠♥♣♦♠♥♣♦♠♥♣♦♠♥♣♦♠♥♣♦♠

For the rest of the costume... 

Crown

A cereal box is my secret source for all things costumes. I once made a Star Wars Clone Trooper costume for Zak out of cereal boxes! They're the perfect stiffness while being thin enough to easily work with. Anyway, I just cut out the zig zag crown, spray painted it gold and glue-gunned it into place. It just sits on top of her bun - no comb; no headband; no bobby pins!

Staff

Again, a cereal box with glued-on red paper cut into two hearts and glued back-to-back with a bamboo stick sandwiched in-between!

Make-up

Red face paint was painted onto lips in a heart shape with a really fine paintbrush. The same paint was mixed with moisturiser for the rosy cheeks. A red lippy would also work, obviously! We used gold eyeshadow on the eyes too. 

Layla and I both love how her costume turned out. She originally was going to be the Cheshire Cat and was just going to model this one for me for the blog, but as soon as she put it on she changed her mind! Not sure how she'll go sitting in class with that huge skirt on though! Ha! 

Want more? Check out a cute and easy crayon costume from

The Day The Crayons Quit here

Book Week costume: The blue crayon
the day the crayons quit.jpg

I feel like it's been ages since I was creative. And I've really missed it! But Book Week is coming up and I love me a good homemade costume. I decided to document them this time - 

before

 the parade - to show how far a little bit of hot glue and cardboard can go! I've made three costumes and I'll share them here in three posts with a couple of easy DIY aspects. I love making costumes for Book Week and Halloween. I think they're my favourite thing to do! Maybe I go overboard, but we all have fun coming up with the ideas and the kids adore seeing it all come together. I never spend a bomb - it's usually just on a few bits and pieces and if fabric is involved, I try to recycle other handmade costumes into new outfits first before hitting Spotlight. This year there is no sewing - despite making a skirt for one of the costumes! First up though is one of my favourite books - probably one of most people's favourite children's books: 

The Day the Crayons Quit

. How adorably funny is it? Being a shorty herself, Annika was the perfect candidate for the stubby friend, Blue Crayon. She's also brilliant at being a cranky pants, so when I told her to look angry, cause she's meant to be all fed up and over working, she did so beautifully! Anyway, the actual costume is easy enough to make - simply glue the cardboard layers in place and fit around the body, glueing alllllll the time. You'll need two sheets of each colour and you'll need to stick them together to get more length else they won't quite fit around a body! I don't recommend hot-gluing the straps on as ours tore (see below!); I think a stapler might be better? Or maybe it's just that cardboard straps and a three-year-old aren't the best combination! The sign was also easy - crayon and lead pencil on a piece of white paper and then glued onto sturdier cardboard and a bamboo stick. The hat was a little trickier! I made a couple before deciding this was the best.

The Day The Crayons Quit hat tutorial

You'll need...

Cardboard the same colour as your crayon colour of choice. I used the square left over from when I joined the two pieces together to make the base.

A hot glue gun

Scissors

Hat elastic or ribbon

A pencil

A small plate - a side plate is a good size

Step 1:

Cut two strips off the end around 3cm wide. Trace around the dinner plate and cut out the circle. Cut one corner into a arc (make it bigger than the circle; you can cut it down to size later).

Step 2:

Roll the arc up into a cone shape and glue in place. Cut off the pointiest part. Cut a smaller hole out in the middle of the circle.

 Step 3:

Poke the cone through the circle and push through until it stops. Draw a line around the meeting point on the underside of the circle.

Step 4:

Remove the cone and cut strips up to the pencil line a centimetre or so apart. Bend them outwards. Pop the cone back into place in the circle and glue where the tabs meet the underside of the circle (or is a hat brim now?!)

Step 5:

Glue the two strips together to make one long line (you might need to tidy it up with the scissors if you're not the straightest cutter of all time. Like me!). Glue the very edge of one side and gently wrap it around the hat brim, pressing while the glue is warm (be careful; it's hot!) and holding until it cools and hardens. Continue around the whole hat. Once finished, turn the hat over and circle around the whole join on the underside of the hat again with hot glue to ensure it sticks - two fine edges of cardboard meeting isn't the most secure thing so an extra blob of glue all around should keep it together. Trim the cone to your desire length. Poke a small hole on either side of the hat (you want the join of the cone to the back) and tie in your elastic. Become the crayon!

{The reno files} A real-life renovation guide: Choosing a team, getting quotes and the trades you may need
reno 1.jpg

Like every other aspect of every other renovation, how you do this will be different to the next person. I can only let you know what I experienced. Choosing a builder/carpenter/certifier etc might be done at the start of your project before you even get ideas. It might not be done until you have approval for your plans or somewhere in-between. The trick with this is this: you can get a ballpark figure of what something might cost you when you're throwing ideas around. But until the plans are approved, the engineer's report is done and they specify what materials are required to build your place, no-one can you give you an accurate price guide. And even then, there are always (ALWAYS!) surprises, problems, muck-ups and/or changes which will affect your bottom line. I discovered this when I started shooting off my draft plans to some local builders whose work I admired. They couldn't really give me a quote until I had the engineer's report. But I couldn't get an engineer's report until I had council approval. And what if what I had approval for ended up being a lot more than we estimated? Because engineers throw in things like steel, bracing, expensive materials, extra footings and extra... stuff! And with that extra stuff comes extra labour to put all the extras in. And it all adds up. To a lot.

But that part of things aside, how do you find the right person? Well sometimes, it's the one person who actually turns up and gives you a quote. Not even kidding - builders are notorious for just not showing up. I had two not arrive, one gave me an estimate range where the difference was $100,000. Another just said he wouldn't do it until I had all the plans. I thought with such a big build, we should go with a proper top-notch builder and complete team. And they all let me down. So we looked into home building courses and what was required and went back to our carpenter who had done some other works at our house. He was qualified as a builder but didn't enjoy doing it - preferred to actually build than manage. He broke down the build and gave us quotes for each aspect of it as he expected it to be if he had free reign to build. We knew there would be extra things that might come with the engineer, but we at least had a guide as to what wouldn't change (brick footings/roof etc) and what would differ depending on materials we chose (decks, flooring etc). He made suggestions and listened to ours. He was happy for us to go owner/builder and for Steve to labour occasionally when he was able to. We decided to go that route and waited for our approval.

Just before council finally stamped our plans (the first time!), Steve decided he had had it with his stressful job and the travel it took to get there (2.5 hours a day). The money was great, but health and happiness is worth more to us so we worked out he'd be able to take some time to work out what he wanted to do and we could still afford to eat and start our build. We just wouldn't be able to do it all in one hit. He decided carpentry was something he wanted to try - he might as well give it a go while work was being done here anyway, right? We spoke to our carpenter about him labouring full time whenever work started and Darren was more than happy with it. He was excited about being able to teach him and suggested there might even come a time when he could join his team. It turned out his apprentice left soon after and Steve had a job. So while we waited for final approval, then for the engineer, then for the certifier to issue our certificate of construction (this all took months after council's second - and final - approval), Steve earned some money working and learning. By the time it was our turn to start work on our job, he'd had a few months under his belt and was confident on the tools. With his new tradie nickname (Steve-O. Of course!) we were ready to begin.

We have a few bonuses building our house this way: our builder acts as our project manager - he orders everything, organises other trades, liaises with the certifier and the engineer. We don't have to take on those trickier jobs. He also - so graciously - does this for no extra cost to his (special-for-us) hourly wage. Another bonus is he came with a ready-made team of other subcontractors so we don't have to go looking for the right electrician, plumber, Gyprocker, etc. And there are many: so far on this job we have used:

Termite and pest man

Brick-layers

Concrete mixer

Sand delivery

Electrician

Hire shop for concrete cutters, scaffold, giant ladders

Plumber

Window maker

Roofer

Crane driver

Welder

Gyprocker

Fireplace installer

Super special electrician to upgrade mains

Still to come (er, most likely not their official titles): stair man, waterproofer, tiler, tv and sound guy, rain tank dude... They're the ones I know about!

We are also lucky our builder is close with the local hardware and so is able to occasionally negotiate better prices on some materials (also, set up a trade account so you get a tradie discount - every little bit counts!). All this to say, we know exactly what things cost because we get a copy of every receipt so there is no mark-ups on materials which I do know can happen.

In the interest of keeping it real, the downside of all this of course is that we often get bumped for another job - generosity of mates rates can stretch so far! So we've been delayed several times as other jobs have spilled overtime or delayed as well due to weather etc. It's not the best way to build, obviously, but we've happily taken this aspect of it on as we know those in-between times mean Steve is earning money too and it's actually nice to have a break from people in and out of your house every day, the constant cleaning, the noise and the fact I have control issues and don't want to go too far in case someone makes a decision on something without me! Ha!

Now I realise this isn't possible for everyone, so I've included some tips on finding a good team. We've only ever used two carpenters in our renovations of our homes - one did the last one; this team has done this house. Coincidentally, our current builder actually apprenticed at one stage for our first one! My point is: find a good one and you'll likely develop a pretty close relationship with them. They see you at your worst - first thing in the morning, when your house is a tip, when you're yelling at the kids to get ready for school (and when they backchat you and the fun and games that comes after that happens!). They become part of your life for a while and so you want to find someone you're comfortable with and who gets what you're trying to do and isn't just out to take your money. This has become somewhat of a showhouse for our builder - it's become his pride and joy too as it's a good example of his work to show other potential clients. You want someone who is passionate about what they do and who wants to be proud of the work they do for you so much so they might photograph it for their website or portfolio - or tell potential clients to swing by and check out the deck/extension/cladding job they did at this place... How to find that person? Yes, well... it's not easy! Maybe we completely fluked it? Maybe it's because we still live in that small-town-feel-kinda-place where people are just happy to get their weekly wage to pay their mortgages and drink beer? Whatever the reason, we got lucky twice. So maybe some of these will help you too.

Speak to your local hardware

Ask for recommendations for a good carpenter/builder - this is how we found ours. Not from Bunnings (Bunnings aren't known to be a trade hardware - they've dedicated themselves to the home DIYer as trades make up such a tiny percentage of their clientele), try the smaller ones or trade chains such as Home Hardware or Mitre 10. These guys know them well - they're in there most days ordering or picking up materials. They chat about the jobs they're working on and they use the hardware as a kind of network to find other subcontractors or labourers if they need an extra pair of hands. The hardware guys aren't stupid - they know the ones who know their stuff, who are down to earth and who are passionate about their work. And they happily pass their details on if you ask them. Same goes for a plumber or electrician - ask at the local plumbing stores (Eagles or Reece Trade) or lighting/electrical stores.

Do a door knock 

I'm not ashamed to say I've door knocked several people and asked them who built/renovated their house! Turns out one builder who did three homes I loved lived in my street (and gave us a quote but the timing was all wrong. And then he moved!), while another I also really liked was booked out for around two years! But isn't that the best kind of advertising for a builder? Having a highly visible portfolio? And I was able to get first hand info on how happy the client was too. If you love a home nearby, go and knock on the door and chat to the owner. They might not know - maybe they moved in and it was already perfect - but if nothing else, you get to meet someone with taste similar to your own (and maybe even get to have a little snoop inside too!) and will probably make their day with your compliment!

Try

HiPages

 I've heard about this for so long and written about it so often but never really knew how it works. Basically, a builder (or pretty much any other trade) pays a large fee each year to be listed. When someone is after a quote for, say, a deck, they will get three quotes. From your end, you get three quotes for the same job. From the other end, if a carpenter agrees to do the quote, they have to pay a fee to HiPages regardless of whether or not they get the job. This means you're only going to get people who are serious about working - because they have to outlay money no matter what. It kind of weeds out the muck-arounds! It also has a good directory on their site for tradies of all sorts in your area.

Ask for recommendations

Oldie but a goodie, of course. If you know someone is renovating, ask them all about who they used, if they were happy with their work and if they'd use them again.

Try out-of-towners

I told our builder I think he keeps getting Sydney calls for quotes because they're hoping if they bring in an outsider, they might get a cheaper quote. And honestly, I think I'm right. I'm adamant that our extension and renovation would be close to triple the amount if we lived in Sydney. Everything outside of the major cities is more affordable - including tradespeople.

Good signs...

*

 They actually show up to your house (seriously).

* They listen to what you want and make suggestions of their own that enhance your idea or offer an on-par alternative.

* They do some measuring on the spot when you're unsure if something will fit and will try their best to make your ideas and plans work.

* They seem genuinely happy to be there and passionate about what they do.

* They will rework their quotes or offer alternatives/options to help you keep costs down or meet a budget.

* They're happy for you to help in some way.

Bad signs...

* They are straight-up negative about what you want to do. "It won't work." "It won't fit". "It's a nightmare job". etc

* They push you towards an easier/more common option because it's less work for them.

* They seem a bit iffy about when they could fit you in - it could be legitimate, but it could also mean they don't want the job.^

Going the owner/builder route

This is what we ended up doing. I'm not going to go too much into it because we kind of cheated and even though we're responsible etc, our builder has taken over this role for us (yay!). But, I'll link you to a section from the

Real Living Renovations

magazine I wrote for more information. And just FYI, we did our White Card/Owner Builder Permit course via

Absolute Education

. It's really not difficult at all - the answers are all there, you just have to read it!

^ FYI: if a tradie doesn't really want the hassle of a job (it's really labour-intensive/filthy/fiddly and time-consuming/lots of roof work in the height of summer or a potential landmine of extra nightmares such as an old house that has lots of secrets inside its walls you won't know about until you start pulling them down), then they tend to increase their quote by a fair bit. This is a hint they don't want the work, but it also means that if you agree to it, they are compensated for the crappiness that will come with them accepting. And I've been on the other side of this - Steve comes home completely exhausted and filthy some days. He's been covered in old insulation, stuck in confined spaces or has been jackhammering concrete floors ALL DAY. Compare that to the joys of building a deck or pergola on a nice spring day! I don't know many people who'd choose the former over the latter!

Well, I hope that helps a little. It's hard finding someone good and it's even harder getting their timings to line up perfectly with yours. But you'll find them - I'm sure of it!

And for more of my Reno Files posts...

{The reno files} A real-life renovation guide: the design process

{The reno files} A real-life renovation guide: introduction

Our house plans: spending big to live small(ish)

A very exciting renovation update

A real, hopefully helpful and honest guide to renovating your bathroom

{The reno files} A real-life renovation guide: the design process
reno 2.jpg

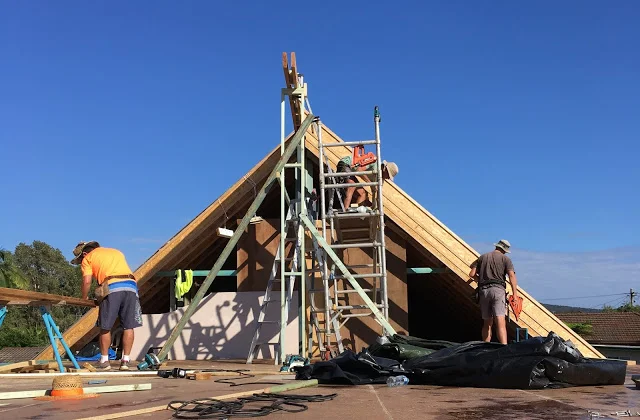
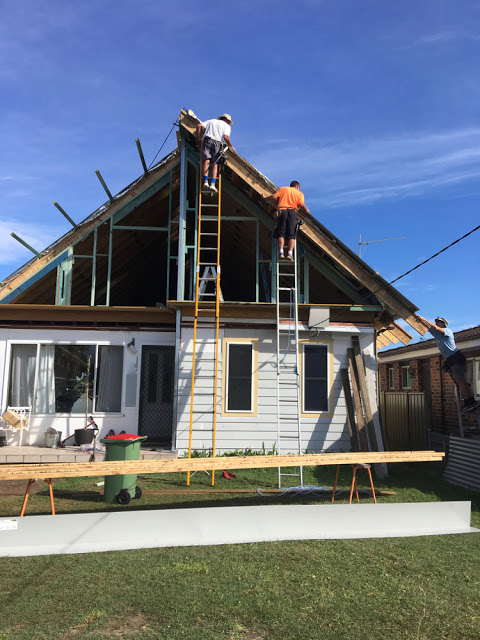
Let's just ignore the fact more than six months have passed since I last published a post on this site. Let's also not talk about the numerous post ideas I have listed in my notebook that haven't seen the light of day. Let's instead focus on how we came up with the design for this extension of ours (which, despite six months later is still three roof sheets short of being watertight from above! It's been... well it was all good until last month when the rain didn't stop and we had no roof. But that is a story for another day... Not six months away though, promise!) 

So. When we were house hunting four years ago we had a few musts: it needed to be a fixer-upper because we wanted to make our own stamp on it. Location was important - we wanted to be close to the water. It had to have good light, good structural bones, a decent yard and the potential for us to add to it. We found the ugliest house in the best street with water views and snapped it up. The good thing about it being an ugly house was there was no history or architectural details which we had to work around which is often the case with old houses. This was fibro. It had plain walls, plain windows, plain cornices, plain everything. It was essentially a blank canvas (and I hate using that term, but it's true). Our last home had pretty cornices, timber windows and a real cottage-y feel to it we tried to keep while modernising it. Our first house was a historical semi we didn't dare touch aside from paint in tones true to its style. This house had nothing really. It gave us freedom to do what we wanted without feeling guilty about veering away from its "style" or stripping it of character. I believe in working with what you have and if it had any redeeming features, we'd definitely have worked with them in the design process. As it happened, we ended up creating the story of our house once work started - we recycled parts of the old roof into stair treads, changed the floor direction in the extension and kept a few original parts like the old knocker and house numbers. We have piles of hardwood from the roof that will become a bar top and library shelves. We reused the huge beams as heads above doorways and windows, moved some windows around and recycled doors. It's nice to have a kind-of-cool answer for the "why is that like that..." questions that might come.

But before we even got to creating a story, we had to create a plan. And while it's tempting to look at magazines and Pinterest and blogs and imagine yourself in that space, there are so many more factors to consider aside from loving something because it looks pretty. Captain Obvious, right? Well yes and no because despite all my constant writing about this stuff, it's easy to get swept away imagining something when the reality is likely to be very different. And know that it's not just a matter of things being different due to your tastes or location, but it's to the rules of YOUR property - and they might be different to your immediate neighbour's. It's the way you live your life. It's your actual home's ability to handle the changes you wish to make. It's your budget. And weather patterns. It's your personal needs and those of every person who lives there. The list of things that can affect your home's design is endless, so by all means look to others for inspiration, but be sure to design the best space for you and your family, taking into consideration all the musts/have-tos and can'ts along the way. After a few harsh realities from Steve (who rolled his eyes every time I showed him an all-white Swedish space and explained "something like this!"), I wondered how close to the mark we would get in terms of creating a home perfect for us. While we've not finished or been able to use our space completely, so far, I can't see much I'd change if I had free reign. Which makes me think the long, long design path was the right road to take. If you're looking at taking yourself on a similar renovation journey, here are a few things we learnt along the way.

Resist the urge to get renovating immediately 

Any magazine article on renovating will tell you to live in your space before you do anything major to it. There is a good reason for this - because it helps you make better decisions. If you can do a full year, do it - because honestly, your home is so different throughout the seasons and you want to ensure you know it back to front. The light falls differently in winter to summer - we discovered the afternoon sun bounces off the verandah of the house across the street from us and rebounds into our bedroom in summer and lights up the south side of the home in winter. We know the afternoon sun is unbearable in summer at the back of our house (which faces West) but that the sea breeze cools things down most days too. We know how the yard floods and where the shade falls for prime planting. We've worked out where we have mould problems, where we like to dump our wallets and keys, how we don't walk down the driveway but across the middle of the lawn to the front door, which way the weather usually comes from and where the rain affects us most. Putting up with all the annoyances that come with an unrenovated house is worthwhile because you work out what annoys you, what you like, how you live, what you need to make living better - knowing all these things is essential for good design. 

Create a wishlist

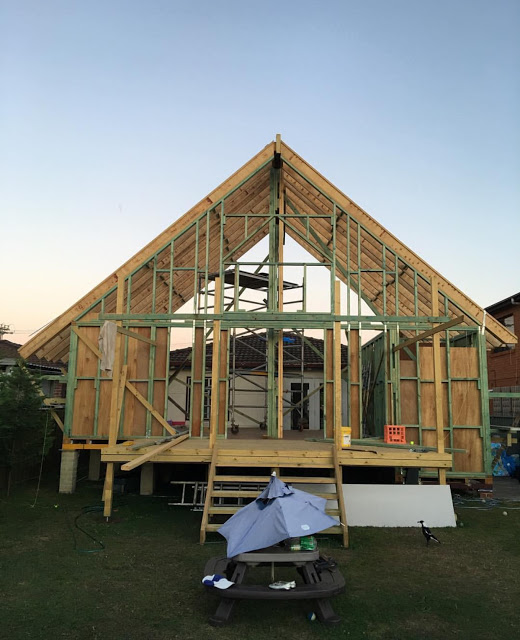
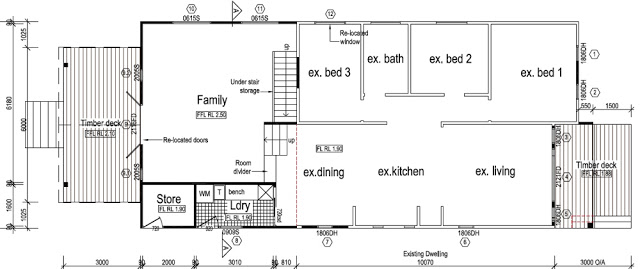
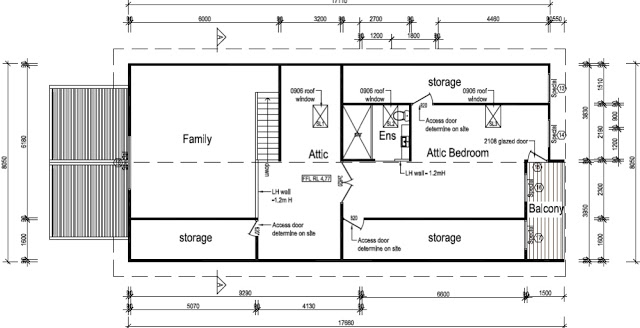
For us, we needed more space - we had a tiny three-bedroom, one-bathroom home. It had a living room, kitchen/dining and that was it. All up, it was 80sqm. We weren't after a huge house, but with four kids, we definitely needed more space! We renovated the bathroom and kitchen spaces with an extension in mind - we decided we could just extend from the back out so worked out a way to do just that so whenever the time came, the existing house shouldn't require much work. And then we planned and planned. We worked out what we wanted exactly: some kind of loft space, raked ceilings, two living spaces and a fireplace. We wanted at least four bedrooms, but five would be better so everyone could have their own room if they wished (I am now DYING for them to all be in their own rooms because I'm over the bed-swapping, whinging, kicking and meltdowns over who gets to stay up later and who doesn't...). I wanted lots of storage because the house had none. So we incorporated a dedicated storeroom into the plans. It turned out that Steve changed careers while waiting for council approval and so the storeroom has been renamed his workshop for all his tools. It will be the world's tiniest workshop but still! Luckily I still had large storage areas planned for the roof - having a high-pitched roof means the unusable areas can be walled off and used to store alllll sorts of things!

Get drawing

I've been a lover of floorpans forever! I'd draw my dream homes all the time complete with indoor pools, ballrooms, sweeping staircases and libraries. Being able to draw up a more realistic one for my family that we would actually build was so exciting! Several variations were drawn up - the first was turning one of the bedrooms into a staircase and adding a whole second storey to take advantage of the water views. Then I thought maybe not the whole hog and just a really high-pitched roof so we can have an attic bedroom. Another version had a master bedroom at the back next to second living space. Another kept our master where it was but stole the bedroom next to it for an ensuite and wardrobe and added two smaller rooms to the back. Yet another plan extended to the side of the house over the driveway. But I kept coming back to the attic idea - why couldn't we just make one big room out the back with a staircase up to a loft bedroom in a new roof? Sounded pretty easy to me, so I called in the draftsman...

Call in the experts

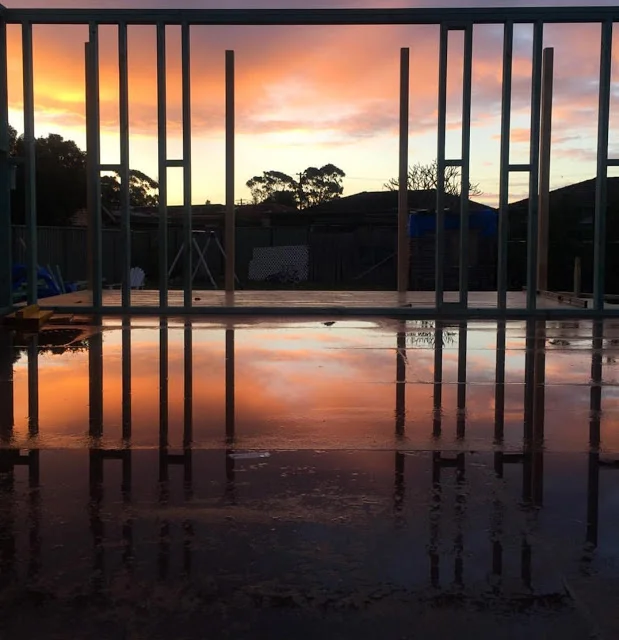
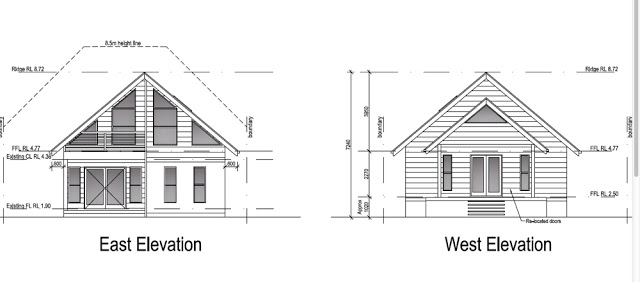
The thing with major renovations is this: there are SO MANY DIFFERENT ANNOYING RULES AND ASPECTS TO THE PROCESS. And you don't really know about any of them until you're at that stage. First up for us was the biggest bummer of all: we had to do a full development application for council. Many renovations and extensions won't require this - you can go through a private certifier and they can have your plans approved within a few weeks. But if you live in a flood or bushfire zone, you most likely won't be that lucky. We live in a flood zone and so straight up we had bonus conditions - the biggest being we had to raise the floor height by 60cm. This meant the nice walk-straight-out-of-your-living-room-onto-your-deck-onto-the-grass moments and easy view of the kids playing in the yard from anywhere in one side of your home wasn't going to happen. It would be about a metre or so off the actual ground. Having to step up the extension means a split level to the ground floor, which means extra materials in height (more bricks for footings/longer pieces of wood) extra precautions in stabilising the building and a more difficult build as it's higher off the ground (we had to lay a subfloor so the builders didn't just rely on standing on bearers and joists - this was an extra couple of thousand dollars immediately). The huge pitched ceiling I wanted with a bedroom in it? Couldn't quite do as I wanted - did you know habitable rooms (living/bedroom) require your ceiling height to be at a certain height (for memory it is 1.8m but I could be wrong there) for 2/3 of the volume of the room? We wanted the angled ceiling to just hit the floor, so in the end, knee walls had to be built to decrease the size of the room so our master bedroom won't quite be as we imagined it at first, but the library can be. There are also height restrictions (we just snuck in for how high our house can be), light-to-dark ratios through use of windows and doors, shading requirements (we need little awnings on our east-facing bedroom to shade them) and so. many. other. annoying. things. The draftsman/architect/builder who designs knows these tricky little things and will outline your options. In the end, our draftsman discovered if we submitted the second story as an "attic bedroom" rather than a second storey, we had a little more freedom with our plans. One thing I suggest is to give your draftsman/builder/architect a ball park figure of what you want to spend - underestimate it, though. Because if you give them no budget to work to, they will design just design to all your whims and you might end up with a house you actually can't afford to build! And never feel you have to do EVERYTHING all at once. It is a good idea to design your home and submit everything in one application with a view to doing it in stages as budget/time/circumstances allow. We never planned to complete our extension in one hit. We wanted to do it in two to three stages with our master bedroom and ensuite being the last thing. If you have plans to put in a pool or garage or separate studio down the track, consider doing it all as one DA and get the approval now. It will save you in extra drafting and application fees later on.

Draftsman vs architect vs builder vs carpenter

Depending on the scale of your works you might not need a draftsman or architect. Many builders are able to draw up and submit plans on your behalf and if it's less complicated works to a place that doesn't change the footprint of your home, a carpenter might be all you need. We knew we needed plans drawn up but as we had a good idea of what we wanted, we knew a draftsman was all we needed. If you're stuck for ideas about what you want, I'd still start with a builder who can at least point you in the right direction of an architect if they believe one is required. 

Make all your changes at this stage

Every time I got a draft plan from the draftsman I printed it out and got out my trusty red pen for changes - because there were always changes. I lived and breathed these plans - even dreamt about them sometimes! But that is the good thing about drafting plans - they are drafts and can be changed. And you should change them at the planning stage because it will cost you a lot more time, effort, money, patience and possibly relationships if you change them once the build begins! For me, I'd use the printouts to just see what it might look like if I moved the wall a little more this way. Or if I moved the door layout or added an extra room. Always sit on the current draft for a while and get a feel for what it might be like. Measure things out - I would use string and mark up the walls/doors/windows on the grass so I could physically see the floorplan in the right scale. Get a feel for the space in terms of size and look for things like views from windows and doors, door swings and potential furniture placement. There is often a little wiggle room for small changes once construction begins such as window size and placement, but nothing too drastic, so get it right now. We took our time with our plans - probably waaaay too long but there were a fair few delays on both sides of the process and in the end, we're glad there was a wait because we love our plans. We were also lucky in that our draftsman had a fixed price so it didn't matter how many changes we made, our $3000-odd fee for the measuring/drafting/submitting didn't budge. Spoiler alert: the engineering fees were a surprise $5000 we weren't expecting! 

Turn negatives into positives

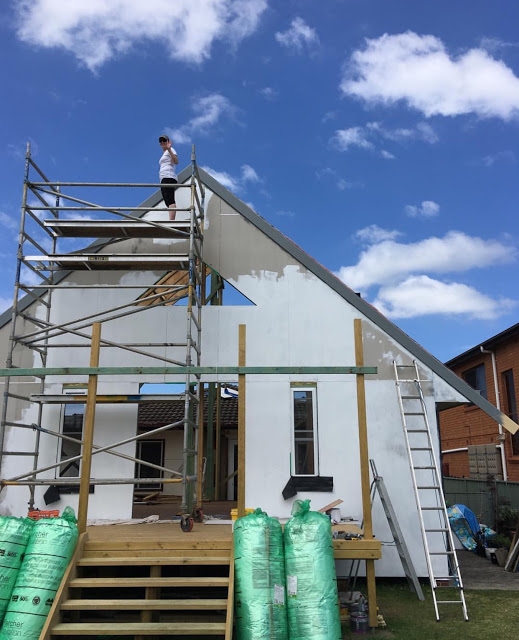
There are going to be restrictions but it's what you do with them... We had to raise our floor level which brought a few headaches for the builders and extra costs for us, but we started to see the advantages of having this split level. For one, it broke up the extra-long space and created two distinct living areas. It allows us to see the water views from the back room and has created a large under-house space where we will able to store our water tanks, excess building materials, kids bikes and surfboards etc. The fact we have to apply builder's bracing (which is essentially thin plywood sheets made from hardwood at $35 a sheet) to all of our existing interior walls killed me (and here I was thinking we wouldn't have to touch the existing house too much!) but it meant we were able to insulate them as well, meaning the bedrooms on either side of the bathroom are now a little more soundproof. It also got rid of the wallpaper that had been painted over and often bubbled up during wet periods and means our Gyprock walls will be nice and straight and new. The engineer's obsession with bracing, particularly expensive materials and extra strengthening requirements means our house is the strongest, well-built thing in town. It's not going anywhere! 

Be realistic with your choices

Sometimes I would look at our plans and wish for larger expanses of glass by way of bifold doors from the family room onto the back deck. And then I remembered the heat in the middle of summer. And the bugs. And the sand and crap that would fall in the rails of the bifolds. And that I love French doors more... We went against the norm because it doesn't work for us. Realistically we knew we needed a decent size door opening but also windows on either side of them that could be open all night long if we wanted for safe, mozzie-free breezes and airflow. We knew as much as a big deck sounds great in theory, it would encroach too much into the backyard, which was more important. And we're not big entertainers anyway. We know pretty pendant lights are going to have to take a backseat to ceiling fans. And timber windows or louvres everywhere were just going to eat too much into the budget. Getting the right mix of practicality and aesthetics is hard and if you really want to live in a place, aesthetics will most of the time lose out to practicalities in a battle of the wits. Like my whitewashed floors. I love them to bits but we're going with a mid-range natural colour for floorboards because we're a rough and tumble family and that's the best colour to mask wear and tear and the inevitable dirt that comes with living with children. (Though Steve is still A-OK with my painting our eventual master bedroom floor pure white. It will have to be a no-shoe zone!) Think honestly about how you live, what your budget is and what is important to you and plan your home around them. 

Expect delays and to pay a lot upfront 

Dear God did we have delays... The whole process has had delays! And they will happen at one stage or another. For us it was just getting the plans right, then not pushing the draftsman to get them back to us as quickly as we should have. Then it was council approving our plans (after a couple of months) but not noticing we had asked for a one-metre extension to the existing house (four square metres in total) at the existing floor height to give the dining room a little more space before the floor level rose. So it was back to council for another six or so weeks as they had to start all over again. Then it was a matter of organising a certifier who couldn't give you a construction certificate to start works until you had waded through their list of things: engineer's report, home builder's course etc. In the end we forked out close to around the $15,000 mark before we even bought any materials or began labour. Here are some approximate figures for you because I honestly can't recall exact amounts and I am too lazy to sift through my disorganised paperwork to find them (sorry!)

Draftsman: 

$3300

Engineer: 

$5000

Council fees:

 $2000

Certifier: 

$3000

Surveyor:

 $200

Home owner/builder course and white card:

 $250

Long-service builder's levy:

 $500

In short, an architect told me when I wrote the 

Real Living Renovations magazine

 to never sign up and start building if all you have is the dollars the builder quoted you. Because it will ALWAYS cost you more, somewhere along the line. And it's usually before the builder even begins! 

I hope this was somewhat helpful. Because frankly I haven't typed this much in a while and my fingers hurt (Kidding. I still write a fair bit; just not here!). If you're about to renovate, you can track down a copy of the reno magazine 

here

 or at your newsagent if they still have them in stock. Otherwise I did find a lot of what I wrote has been uploaded to the Homes to Love website. It's not everything, but it's a fair bit. I've linked to a few of the sections below.

Guide to hiring an expert

Choosing the right team

Researching and shopping

Surviving the construction stage

8 steps to a well-designed home 

Kitchen design

Bathroom renovation

The owner/builder: what you need to know

The power of paint

Spotting the warning signs

Where your money goes

Renovating sourcebook

And for more of my Reno Files posts...

{The reno files} A real-life renovation guide: introduction

Our house plans: spending big to live small(ish)

A very exciting renovation update

A real, hopefully helpful and honest guide to renovating your bathroom